I have been looking for some fun things to do for me and my boys this summer. Since we just moved to Arizona, I thought finding creative ways to stay cool and have fun was a must! We do have a pool and everyone has told me we will spend all of our time in it this summer, however, I do not WANT to be in a pool everyday! I don't know about you, but I don't like pool hair, or having to shower and get ready after being in the pool (which I am one who has too), especially if you have already showered and gotten ready once that day! My kids also can't understand the concept that Mom doesn't want to get her hair wet and constantly try to splash and dunk me. So, here are some alternatives I have found, mostly thanks to Pintrest!
1.
Homemade Sprinkler
This one first caught my eye! What a fun way to have a sprinkler for them to run in. It only costs for the male, female adapter, which can be purchased at any hardware store, including Walmart and Target, for about $5.00. Then it is just using an empty 2L bottle, which most people drink in the summer at any party, right? You just poke holes in the bottom and hang it from a tree. So much fun!
2.
Make Superheroes
a.

b.

c. 

a. Make superhero outfits, for boys or girls! The first image is just made out of 2 empty pop bottles, spray painted in whatever color you want. Glue them to a piece of cardboard the same width at the bottles side by side. For the straps, attach ribbon with glue, staples, really whatever you think will hold it. Finally, use crepe paper, or left over fabric to create flames. Glue to the inside of the bottles and you are set!
b. The second one is simply making superhero logos the kids can attach to their shirts, cape, or as shown above, on toy buckets to make cleaning their rooms easier. These are just made out of felt, which is usually around $0.29 a piece or less. (Michael's, Hobby Lobby, Walmart, Target) You will also need to print out the superhero logo (
click here for the printables). After you have cut out the shapes from paper, pin it to the color of felt you want, cut the felt out, and then simply hot glue them together! So easy and cute. You can use safety pins to attach them to shirts.
c. My friend just made these adorable masks for my boys and her girls and they wore them everyday for the entire week we were visiting. They are AWESOME, and so easy. The image originally came from a cereal box, but can be found here. Again, all you will need is felt and small elastic ribbon. She made 2 per child and sewed them together around the eye holes and the shape itself, 2 colors of their choice so it can be reversible. Attach the elastic in between the 2 colors before you sew so it doesn't show. The kids literally wore them all of the time, including to bed! They would reverse the color for different roles and powers. It was so fun!
3.
Dirt and Beach Cups

Dirt cups! I loved these as a kid, and they are still good as an adult!
a.
Dirt cups require chocolate pudding, smashed Oreo's, and bugs like the gummy worms. You can be creative though if you can find other kinds of gummy bugs! Just make you pudding, set aside. Crush the Oreo's (great job for the kiddos to help with!). Layer starting with the Oreo's, then pudding, and finish off with the Oreo's. Then let them put their worms in or on the dirt. Serve them chilled.
This can also make a fun friends or family over dessert. My aunt displayed in once in a big Terra Cotta pot. She had the bowl with the pudding sitting inside of it. She had fake plants coming out of the top so it looked like a potted plant with dirt. It was really neat. (just a side note!)
b.
Beach cups. Here are two versions of them. The first one is made with Vanilla pudding and blue food coloring, whipped cream with Oreo's in them and then sweetish fish on the top. Layer pudding, whipped cream, etc until pudding is on top and then put your fish in.
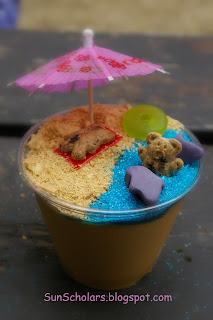
b2. The second version is made with butterscotch pudding, blue colored sugar, crushed up graham crackers, part of a fruit roll up (the towel under the teddy graham), a life saver, teddy grahams and fruity gummies. Top it with the little umbrella. You should either be able to make a bunch of them at once or have plenty of left overs for another time!
4.
Go on a Scavenger Hunt

Everyone can get empty toilet paper rolls pretty quickly. Just make sure everyone in your family knows to set them aside until you have the amount you need for your binoculars, 2 per child. These are so easy to make, just glue the 2 rolls together along down the middle, long ways. Use a hole puncher (or pair of scissors) to poke a hole on either side of the rolls. Finally attach yarn, or string, or ribbon through the holes punched so they can hang on the child like a necklace.
Have the kids write down what they think they will see on their adventure, or maybe pick out 10 things you think they should find. Give them the paper and a pencil and go exploring. You could take these to a zoo or botanical garden to the kids can "see better" or find more things through them. They will have a blast.
5.
Make Healthy Treats
a.

b.

a.
Apple Cars- These are incredibly easy to make. Just slice an apple into medium sized slices. Cut grapes in half and attach one on either side of the front and back of the apple, attaching with a toothpick.
b.
Apple Mouths- Again, slice your apple into thin slices. Spread peanut butter on the insides of 2 slices. Attach marshmallows to one apple slice and then top with the other peanut buttered slice.
6.
Make some 4th of July treats
a.

b.

a.
4th of July Popsicles
These take:
1 Cup Cranberry Juice
1 Cup Lemonade
1 Cup blue Sports Drink (Gatorade, Powerade)
1. First put Cranberry juice at the bottom of a small cup and freeze until almost firm (about 1 hour). Place popsicle stick in .
2. Next, fill about 2/3rds of the way up with Lemonade and let freeze.
3. Finally, fill the remainder with the Blue Sports Drink and let freeze.
4. Pull out of the cups and enjoy!
b.
4th of July Pretzel Rods
With these, simply dip the ends of the pretzels (I like half way), with melted white chocolate, white almond bark, or dipping chocolate. Immediately cover with your Red, White, and Blue sprinkles or colored sugar. Let harden and then eat.
**One trick with dipping things like pretzels or strawberries, put a small amount of vegetable or olive oil in the chocolate until it runs off your spoon smoothly. It should be about a tsp or less, but it just helps cover things easier and with no clumps.
7.
Movie Mania

Of the 3 areas I have lived in since I had children, each have had a Summer Movie Program. Basically, they will have a movie each week that is an older movie, but it will only cost between FREE and $1.00 per person. Some areas, like Birmingham, have more than one movie option, maybe something rated G for the youngest kids like Hotel Transylvania, and something PG for older kids like Alvin and the Chipmunks- Chipwrecked. Some of the different theaters would even be playing a different movie in different locations, so see what you would like to watch the most.
This last week, we got to watch Madagascar 3- Europe's Most Wanted. This week it will be The Lorax. This keeps you busy at least one day a week. If your area has more than one movie, you could go multiple times that week. If you don't know if your theater does this program, google your area or ask friends!
8.
Balloon Games
a.

b.

c.

a.
Water Piñatas. Just find some waterproof toys to put inside the balloons for prizes and hang the balloons up throughout your yard.
b.
Balloon Race. The object is to see who can get the most balloons into their basket only using pool noodles. You can have a time limit if you want, but do not have to.
c.
Balloon Horseshoe. The picture shows where they have put a point value on each balloon. You can either do that or maybe a set amount for each balloon. Using helium in the balloons, tied them around in various parts of your yard. Use a hula hoop to toss over the balloons to collect your points.
9.
Ball Games

a.
Kid Croquet. For this one, cut hula hoops in half and spread them throughout the yard for the "wickets" or hoops. Use medium to large bouncy balls or kickballs. If you do not have flags already to use, you can make some very easily with a dowel and felt or left over pieces of material.
b. Good old fashion
KICKBALL!! Get a group of friends together and get a small bouncy ball or kickball. We just did this with some friends last week and had so much fun! We even had two 3 years olds and it worked perfect for them too.
10.
Playgroup
Depending on your area, you will need to figure out what will really work for you all. For instance, right now here in Phoenix, it has been 112-114° for the past several weeks, so a playground Playgroup would be pretty much out of the question, even early in the morning. We do have some covered playgrounds, so those ones might work.
Another possibility is to go to a splash pad. Of the 3 areas I have lived in, there have been several FREE options to choose from. There are also paid ones, but why pay when you can go to a free one? If you don't already know of one in your area, google it or ask around to people who have lived in the area longer than you. You should be able to find some good options that will work for you and your friends.
Hopefully this has given you some fun options to keep you busy with your kids this summer!
Hope you enjoy!
~The Sissies~