Peach season is right around the corner! Seriously one of my favorite times of the year...which makes me really sad that I am not in Idaho to enjoy that this year...and many to come. Luckily, a couple of the stores here have had great deals on peaches and I have loaded up! So I thought I'd share of few of the deliciousness of peaches, and things you can do with them.
I made this peach bake for breakfast one morning, it was super healthy and really yummy!
- 2 1/2 cups sliced peaches
- 1/2 tbsp lemon juice
- 1/2 tbsp cornstarch
- 1/4 tsp cinnamon
- 3/4 cup shredded wheat, crushed
- 2 tbsp brown sugar plus, and I used 2 little packets of Truvia sugar, which is a natural sweetener
- 2 tbsp applesauce
- 1/4 tsp salt
- A couple spoonfuls of yogurt of your choice
Preheat oven to 350F. Mix the peaches, lemon, cornstarch, cinnamon, 1/2 the salt, and 1/2 the sweetener in a bowl. Let sit for ten minutes. Meanwhile, stir the crushed cereal, remaining sweetener, remaining salt, and applesauce in a bowl until well-blended. Spread the peach mixture in a small baking pan, top with cereal mixture and cook for 45 minutes.
When it's done top off with yogurt and enjoy! **This made 2 servings
My very favorite way to eat peaches is peaches and cream, we usually have this daily when we have peaches. First you boil the peaches for like 30 seconds, and peel the skin off, take out the seed and slice up. And then you can either pour in real cream or I usually don't have real cream so I just put in milk and a couple spoonfuls of sugar and enjoy! It's so good because the peaches are still warm from being boiled, so it's the perfect combo!
**I've heard a trick that if you cut a peach down the middle opposite of the line that is already on the peach, then it's a lot easier to take the seed out. If you do it the other way, a lot of times the seed will split in half.
Another thing I do is boil them, take the skin off, slice them up and freeze them for shakes or whatever else in the future. One thing that came in handy lately, my daughter has been teething HORRIBLY, so I would cut up the frozen peaches into little pieces and she would chew on them, I'd like to think that helped with the pain a little bit.
Here's a few other things I've seen...but haven't tried yet...but will try because they look delicious!
Brown sugar baked peaches found
here
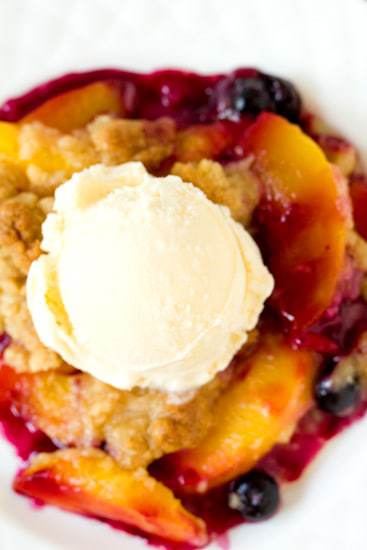
Peach and blueberry crumble found
here

Peach Dessert found
here
I don't have a picture, throw in a half a peach with a couple scoops of ice cream and make a peach shake! YUMMO!
--Michelle--
I am going to add to Michelle's because I was going to do a "Peaches" post also! I just finished making a bunch of my favorite peach treats this past week too! Since I live right by the famous, "Georgia Peaches," I also LOVE this time of year. They are DELICIOUS! So my favorite treats are dried peaches and dried peach roll-ups. So I will give you a quick intro to how to make them, if you have a dehydrator. . They are easy and yummy so your kids will love them. My son would take a peach roll-up almost every day last year for his school lunch.
First, you have to blanch them (place in boiling water) for about 5 min. This will help the skin to come of quickly and easily.
Next, cut them in half, remove the pit, then remove the skin. Slice the peaches into thin slices. Try to get them about 1/4" or less. This will help them to dry faster.
Lay them out in a circular pattern around the tray taking up as much space as you can. They will shrink a little as they dry. Make sure to use the mesh liner to put the fruit on. Once you have all of the trays filled, start the drier on 155° for 2 hours, then drop it to 135° for the remainder of time. I will generally rotate the trays every 2 hours putting the bottom 2 on top each time.
This is what they look like after they are dried. Go ahead and take them off the tray and put them in a ziplock bag. I also then put that in like a plastic shoe box container so they don't dry out before they can be eaten.
For the fruit roll-up, you will do the same initial process of removing the pit and skin. Place the halves in a blender and puree. I never add sugar or anything else.
Pour out evenly on the tray thickly. Make sure to use the solid, plastic liner for these. You do not want to see any of the tray through it. Use the same settings for the drying times too (155° for 2 hours, 135° until dry).
This is what they roll-ups look like dry. The trick with them is that once there is no more wet areas, you start getting out approximately 6" pieces of plastic wrap set on the counter. Do not turn the drier off! Only take one tray off at a time or your roll-ups will become brittle.
Tear them into half, and then tear each half into half. Place 1/4 of the fruit on each tray at a time quickly rolling up onto the plastic wrap after. I store this again, in one of the closed top shoe box size, plastic containers and they stay fresh for at least a year. They are usually gone by then so I can't guarantee any longer!
~Stacy~