Friday, August 30, 2013

Giveaway!!!

We are so excited that we have reached 100,000 views!!!  We want to celebrate by having another GIVEAWAY!  This time it is going to be a Halloween Package.   This will include 3 of our new Halloween products, a Glow in the Dark Ghost, a Trick-or-Treater, and a little pumpkin.

To be a winner, you have to: 
1.  Follow us on this blog (if you already do, it's a free entry)
2.  Follow us on Pintrest
3.  Like us on Facebook


Thanks again for all your support and looking at our stuff!  We will announce the winner 9/14/13.  Good luck!
~The Sissies~ 


Saturday, August 24, 2013

Glow in the Dark, Halloween Ghosts

I love Halloween and I am trying every year to add cute decorations to my collection.  These are the cutest ghosts!  I am so excited to add them this year.  I know it is a little early for Halloween, but why not get prepared early.

This is a fun project to do with your kids.  For the project you will need a 3' X 36" cheesecloth pack, fabric stiffener, glow in the dark paint (in the craft section), a 2 L bottle, 2- 16oz bottles, a 3" Styrofoam ball, and E-6000 glue.

1.  First you will take the cheesecloth out and unfold it all the way out.  Next, fold it into thirds.
2.  In a medium sized bowl, mix 8 oz of fabric Stiffener, and 4 oz of the glow in the darkFill paint together in the bowl.  Crumple up the cheesecloth into a ball and stick it in the mixture.  Stir it around until the cloth is completely covered.  Let it set for 30 minutes.
3.  Take the 2-L bottle and cut 2- 1 1/2 inch ovals in the front towards the middle.  (You will attach the arms there so cut them where you think the arms would look the best).  One will be at 10" up and the other at 9".
4.  Attach the 2- 16 oz bottles into the holes and secure with hot glue.
5.  Fill the 2-L bottle about a 1/3 of the way with water.  Attach the styrofoam ball on top of the bottle.
6.  After 30 minutes, squeeze the cheesecloth out as much as you can.  Spread it out and on top of the plastic bottles.  Move the cloth around the arms and head so you can see some definition.  Also spread the bottom out so it will be able to stand on it's own once dry.  Allow to dry over night or several hours.
7.  Using black or dark card stock, cut out 2 oval eyes.  Attach on the inside of the ghosts head using E-6000 glue.
8.  Light it up or leave it under the lights for a little bit and then turn off your lights and let it glow!!!

We will also have these listed in our More Sister Stuff Shop, if you would rather just buy a finished product!

~Stacy~

Wednesday, August 21, 2013

Creamy Chicken Taquitos

Ok, this recipe is one of our favorites, and I got it from one of my favorite sites...Our Best Bites!  We have a revolving "Kid of the Week" schedule, and with that schedule the "kid" gets to help with the meal planning and prepping.  Last week my daughter was telling me that this year she wants to always choose to eat hot lunch on the days they are serving "Crispitos"  (my kids only get to pick 2-3 days a month they eat school lunch).  When I asked what that was she started describing Taquitos.  I said, "How about we make some this week?" "Really?  You can help me do that?"  "Of course," I respond, "I am Super Woman, remember?" Ha ha!!  I am not, I wish I were, but I am not!  But I can make taquitos with the help of Our Best Bites!  :)


Creamy Chicken Taquitos

1/3 C. (3 oz) cream cheese
1/4 C. green salsa
1 T. fresh lime juice
1/2 tsp. cumin
1 tsp. chili powder
1/2 tsp. onion powder
1/4 tsp. granulated garlic, or garlic powder
3 T. chopped cilantro
2 T. sliced green onions
2 C. shredded cooked chicken
1 C. grated pepper jack
corn tortillas (I use flour if that is what I have on hand)
Kosher salt
cooking spray

Heat oven to 425.  Line baking sheet with foil and lightly coat with cooking spray.  Heat cream cheese in microwave for 25-30 seconds, so it is soft and easy to stir.  Add green salsa, lime juice, cumin, chili powder, onion powder, and garlic.  Stir to combine and then add cilantro and green onions.  Add chicken and cheese and combine well.  You can prepare up to this step ahead of time and just keep in the fridge.
Work with a few tortillas at a time and heat in the microwave until they are soft enough to roll without cracking. Usually 20-25 seconds will do.  
Place 2-3 T. of chicken mixture on the lower third of the tortilla, keeping it about a 1/2 inch from the edges.  Roll up the tortilla and place seam side down on a baking sheet, not touching each other.  Spray lightly with cooking spray or brush with olive oil and sprinkle lightly with kosher salt.  Place pan in oven and bake for 15-20 minutes or until crisp and the ends start to get golden brown.  Remove from oven and let cool slightly before serving.  Serve with sour cream.

This is one of those dishes that I like to make a double batch and freeze the leftovers for another meal another day.  They freeze up great! 

~Rachel~

Tuesday, August 20, 2013

Best Oatmeal Cookies Ever

When Heather and I were in college, we had an RA come by one night to check on our apartment and she brought us these cookies.  They were honestly the best oatmeal cookies I'd ever had.  They had chocolate chips and butterscotch chips in them.  We HAD to get the recipe from her.  A few weeks ago, I was visiting in Colorado and had the privileged of eating these DELICIOUS butterscotch  cookies at a cookie store.  They reminded me so much of the recipe I now have and I had to make them again.  Hopefully you can enjoy them as much as I did!


1 C. Butter
3 oz. Cream Cheese, softened
1 C. Shortening
3 C. Brown Sugar
2 C. Sugar
3 Eggs
1 Tbsp Vanilla
5 C. Flour
3 tsp Baking Soda
2 tsp Salt
2 1/2 C. Oats
2 C. Chocolate Chips
2 C. Butterscotch Chips

Mix butter, shortening, cream cheese, sugar, vanilla, and eggs in a large mixing bowl until creamy.  Add dry ingredients.  Add the chips.  Spoon onto cookie sheet and bake at 350° for 11 minutes.

~Stacy~

Monday, August 19, 2013

Chicken and Broccoli

It is getting to that busy time of the year again (oh wait!  Did it ever slow down?!? Not here I guess)
Anyway, it is just about time for school to start here, and that always means my life as a Mom becomes very hectic.  This year I think it is going to be even more so with the hubby opening his own practice (next week!!) and three kids in piano, homework, basketball, softball, one wishing for gymnastics, activity days, throw in a few nights of me giving massages and you have a very hectic schedule.  I usually set aside the busiest day of my week as "crock pot day."  It helps my life become a little easier, with one less thing to worry about.  Last school year it was Thursday.  I would get the kids on the bus and then as I was cleaning up breakfast I would also start dinner.  I just found it easier to only have only clean up time.  Some recipes like this one only require a few hours and I would start them as I cleaned up lunch.
I love the easiness of crock pot meals.  They are for the most part, quick and easy, and then you get to smell them cooking all day long!  YUM!


I call this one Sunday Chicken and Broccoli because it only needs to be in the crockpot for 3 hours, and since church for me is 3 hours, it is perfect!  But we have it on all different days and it still tastes just as wonderful!  In fact, I made it last week and my little family of 5 1/2 (Oakli doesn't eat much) ate the entire crock pot full in one sitting!!


Sunday Chicken and Broccoli

2 to 3 C. cooked rice
3-4 cooked chicken breasts, diced
1 bunch of broccoli, steamed and chopped
2 can of cream of mushroom soup
1 C. Mayonnaise (we like Miracle Whip)
1 T. lemon jiuce
1 1/2 shredded cheddar cheese

Pour rice in bottom of crockpot.  Layer the chicken and broccoli on top of rice.  Make a sauce with the remaining ingredients and pour over the top of everything.  Set crock pot to low for 3 hours (or while at church).  

~Rachel~


Thursday, August 15, 2013

Camo Cupcakes

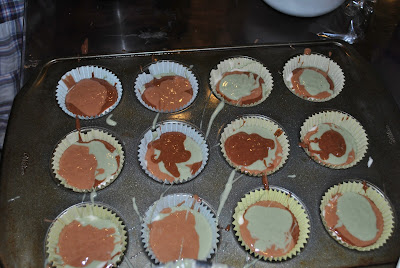
My son just celebrated his 5th birthday.  He is my only summer b-day in the family and I was so excited to make him an ice cream cake, but he didn't want one.  He wanted cupcakes!  Cupcakes? Really?  And then I remembered that my friend had made some darling camouflage cupcakes for her oldest sons birthday this year.  Well, my little guy loves camo everything, so I knew they would be a hit!


My girls were very excited to help me with this adventure, and we ALL love how they turned out.


Here is what you will need...

Chocolate cake mix
White cake mix
All the ingredients that go with the two cake mixes (eggs, oil, water, ect...)
Green food coloring
four mixing bowls (can be small)

Make your cake mixes according to directions, DO NOT BAKE.  :)
In the four bowls you will need 1. just white, 2. just brown, 3. will have white with a dash of brown and green food coloring to your liking, and 4. will have equal parts of both chocolate and white.
so again...
1. white
2. brown
3. green
4. tan
I hope this is not confusing.  :/

Line your cupcake pan.  Preheat the oven according to the directions on your cake mix boxes.
Now for the fun part!! Have one teaspoon for each bowl.  I used our cereal eating spoons.  My girls were each in charge of one bowl and I had two.  Then we just started putting a spoonful of our color into each cupcake liner.  Fill them until they are about 2/3 full.  Bake.
I made my basic Cream Cheese frosting and just added a little cocoa to make it tan.  My son LOVED them!

4 oz cream cheese
1 cube butter
1/2 tsp vanilla
4 C. powdered sugar
Mix ingredients.  You can add a little milk if it is too thick, but you probably want it a little on the thick side for cupcakes.

Enjoy!
~Rachel~

Tuesday, August 13, 2013

Nicholas Sparks, The Choice

Another great Nicholas Sparks book is "The Choice".  


Travis Parker strikes up a friendship with his new neighbor, Gabby Holland.  All of his friends are happily married with great kids too.  This is what he has wanted too but just hasn't found "The One" yet.  He is hoping the friendship will blossom to something more, but their is one problem, she already has a serious boyfriend of several years.
This is also a very touching book with fun and witty times, a great love story with another heart wrenching moment too.  Be ready for more tears!!  I highly recommend "The Choice" as another good book to read!
~Stacy~

Monday, August 12, 2013

French Dip Sandwiches

   I have always loved French Dipped Sandwiches and have tried to make them a couple of times, but they never turn out like a restaurants...until now!!!  My family recently visited my sister-in-law and she made these for us.  They were absolutely delicious.  I had to make them the very next week at home because I liked them so much.  Just the aroma in the house while it is cooking is enough to set you over the top!!!  My sister-in-law and her sisters also share MANY recipes on their blog Stir Occasionally.  I can't wait to check out more from there!

For the French Dip Sandwiches, you will need:

Ingredients:
4 pounds beef chuck roast
1 tablespoon minced garlic
1 tablespoon dried rosemary
3 bay leaves
1 cup soy sauce
6 cups water
Directions:
Place roast in slow cooker. Season with garlic, rosemary, and bay leaves. Pour in soy sauce and water. Cook on low setting for 6 to 10 hours. Unlike most roasts, the longer the better.
To serve, place in hamburger buns or split french bread and top with your preferred cheese if desired. Feel free to dip your sandwich in the au jus left in the slow cooker too!
~Stacy~

Friday, August 9, 2013

Nicholas Sparks, The Last Song

   I have recently finished another series of books and was in search of something else good to read.  I had read a couple of Nicholas Sparks books quite a few years ago and really enjoyed them, so I thought, "What the heck, I'll try another one".  The (ebook) waiting lists for most of his books were REALLY long, so I started with the shortest one on the list, "The Last Song".  
   

Ronnie and her brother, Jonah, have to go to North Carolina at spend the summer with their father who she hasn't spoken to in three years.  She learns who she is and really, what is important in life.  She finds love and forgiveness too.  
   I LOVED this book, but be ready for a HUGE tear jerker.  I was really sobbing at one point, but it was worth it!  Such a good book!  Hope you'll enjoy it too!
~Stacy~

Thursday, August 8, 2013

Yummy Bars


This was one of my favorite treats growing up, and we were not even the ones who made them!  Heather's friend would always bring them over for us and they were usually gone in +2 days!  Finally, just before going off to college, we got the recipe from her so Heather and I could make them there, to impress boys there, and it did!  I have made them for friends and my kids now and they love them too.  I made them again today and my kids asked if they were really called "Yummy Bars" or if I just called them that because they are "Yummy".  The answer is, it fits for both questions.

The recipe is as follows:

6 Cups of Rice Crispies
1 Cup Sugar
1 Cup Caro Syrup
1 Cup Peanut Butter
1 Cup Chocolate Chips
1 Cup Butterscotch Chips

(This will fill a 9X13" pan.  If you want a full cookie sheet of them, do 9 cups of Rice Cripsies and 1 1/2 cup of everything else).

1.  Put rice crispies in large bowl for mixing.
2.  In a medium sauce pan, combine sugar and caro syrup on medium heat until sugar is dissolved and the mixture is boiling.
3.  Either turn the burner to low, or take pan off the burner and add the peanut butter.  Once the peanut butter is melted, add to the rice crispies until evenly mixed.
4.  Pour rice crispy mixture onto the pan and pat until flat.  (I recommend you spray your hands with cooking spray to pat flat.
5.  In another sauce pan, melt the chocolate and butterscotch chips then spread over the rice crispies.
6.  We have always cut them into 1 to 1 1/2 inch squares to serve.

Monday, August 5, 2013

Chocolate Zucchini Bread

A couple of years ago, when visiting my Mom around this time of year, she had made batch after batch of this wonderful zucchini bread.  I could not get enough.  Sadly, she already had homes for most of the loaves.  I could not wait to get home and have a reason for making some of my own, but really, lets be honest, do you need a reason other than wanting a little chocolate?!? And it must be healthy right?  It has zucchini in it!  Anyway, back to this healthy bread...

Chocolate Zucchini Bread
2 (1 oz) squares unsweetened chocolate
3 eggs
2 C. white sugar
1 C. oil
2 C. grated zucchini
1 tsp. vanilla
2 C. all-purpose flour
1 tsp. baking soda
1 tsp. salt
1 tsp ground cinnamon
3/4 C. semisweet chocolate chips

Preheat oven to 350.  Grease (2) 9 x 5 loaf pans.  In a microwave safe bowl, microwave chocolate until melted, stir occasionally until smooth.
In a large bowl combine sugar, eggs, oil, zucchini, vanilla and chocolate.  Mix well.  Stir in the flour, soda, salt and cinnamon.  Fold in the chocolate chips.  Pour batter into prepared loaf pans.
Bake in preheated oven for 60-70 minutes, or until a toothpick inserted in the center comes out clean. 

I have to admit, every time I have made this, mine stick to the bottom, not all of it, just a few chocolate chips here and there.  I called to complain to my mom and she said she has had the same problem in the past and she recommended that I use a little parchment paper lining the bottom.  I am trying this trick tomorrow, hopefully I get to it, and I will let you know how it goes!  :)


Happy Baking!
~Rachel~
Related Posts Plugin for WordPress, Blogger...