Saturday, June 22, 2013

Spring Cleaning- Outside Edition

   We just posted the "Inside Edition" on things we were going to Spring Clean inside our homes, this one will be strictly on our to do lists for the outsides of our home to get ready.  Here are some ideas for your own yards!

*  Trim shrubs, trees, bushes.  If you are not familiar with the area, plant, or just gardening in general one safe thing to do is watch for the people around you to start trimming the same kinds of plants.  Watch especially for professional landscapers to be doing it since they will be most likely to know when it is appropriate.  For example, when Stacy moved to Texas, she had never been around Crepe Myrtle trees and had never done anything with them.  She just waited until she saw people trimming them along the sides of the roads (all professionally landscaped) and then did the same at home-all was well, everything came up full bloom that year!

*  Aerate your lawn.  If you live in an area with clay dirt or your lawn has heavy traffic on it, this is a great thing to consider.  Heather does this to her lawn every year and her lawn looks AMAZING every year too!    If you have Bermuda, Zoysia, or St. Augustine grass, it is best to do this from April to June.  Fescue, Bluegrass, and Rye are best to be done August through October.

*Fertilize!  The local stores in your area will have the fertilizer grasses common for your area needs and most will have an expert if you have questions on how and when to apply.

*Insect and Bug sprays, pellets, repellents   These also can be found at local stores and you can ask what the best products are for the particular pests in that area.  Ex:  Fire ants in Alabama- there were a lot of products out there but there were some that were far better than others.  We would also find out when our neighbors were going to spray because it really did no good if we sprayed and then 2 weeks later they did, it would just cause the left over bugs to come right back to our lawn, so try to coordinate with them!

* Mulch flower beds!  Clean out old or dead plants, plant your new ones and then mulch around everything! It not only looks amazing, but it helps keep the weeds out and helps keep the moisture in better for the plants you do want there!

There are probably things we have forgotten and definitely things are different throughout the country so one more suggestion would be to check with your local nursery and see if they have a nice "Honey-Do" list specific to your area.

~The Sissies~


Friday, June 21, 2013

Summer Fun Ideas


  I have been looking for some fun things to do for me and my boys this summer.  Since we just moved to Arizona, I thought finding creative ways to stay cool and have fun was a must!  We do have a pool and everyone has told me we will spend all of our time in it this summer, however, I do not WANT to be in a pool everyday!  I don't know about you, but I don't like pool hair, or having to shower and get ready after being in the pool (which I am one who has too), especially if you have already showered and gotten ready once that day!  My kids also can't understand the concept that Mom doesn't want to get her hair wet and constantly try to splash and dunk me.  So, here are some alternatives I have found, mostly thanks to Pintrest!

1.  Homemade Sprinkler 


This one first caught my eye!  What a fun way to have a sprinkler for them to run in.  It only costs for the male, female adapter, which can be purchased at any hardware store, including Walmart and Target, for about $5.00.  Then it is just using an empty 2L bottle, which most people drink in the summer at any party, right?  You just poke holes in the bottom and hang it from a tree.  So much fun!


2.  Make Superheroes
a.

b. 

c.   

a.  Make superhero outfits, for boys or girls!  The first image is just made out of 2 empty pop bottles, spray painted in whatever color you want.  Glue them to a piece of cardboard the same width at the bottles side by side.  For the straps, attach ribbon with glue, staples, really whatever you think will hold it.  Finally, use crepe paper, or left over fabric to create flames.  Glue to the inside of the bottles and you are set!
b.  The second one is simply making superhero logos the kids can attach to their shirts, cape, or as shown above, on toy buckets to make cleaning their rooms easier.  These are just made out of felt, which is usually around $0.29 a piece or less.  (Michael's, Hobby Lobby, Walmart, Target)  You will also need to print out the superhero logo (click here for the printables).  After you have cut out the shapes from paper, pin it to the color of felt you want, cut the felt out, and then simply hot glue them together!  So easy and cute.  You can use safety pins to attach them to shirts.
c.  My friend just made these adorable masks for my boys and her girls and they wore them everyday for the entire week we were visiting.  They are AWESOME, and so easy.  The image originally came from a cereal box, but can be found here.  Again, all you will need is felt and small elastic ribbon.  She made 2 per child and sewed them together around the eye holes and the shape itself, 2 colors of their choice so it can be reversible.  Attach the elastic in between the 2 colors before you sew so it doesn't show.  The kids literally wore them all of the time, including to bed!  They would reverse the color for different roles and powers.  It was so fun!


3.  Dirt and Beach Cups


Dirt cups!  I loved these as a kid, and they are still good as an adult!
a.  Dirt cups require chocolate pudding, smashed Oreo's, and bugs like the gummy worms.  You can be creative though if you can find other kinds of gummy bugs!  Just make you pudding, set aside.  Crush the Oreo's (great job for the kiddos to help with!).  Layer starting with the Oreo's, then pudding, and finish off with the Oreo's.  Then let them put their worms in or on the dirt.  Serve them chilled.
  This can also make a fun friends or family over dessert.  My aunt displayed in once in a big Terra Cotta pot.  She had the bowl with the pudding sitting inside of it.  She had fake plants coming out of the top so it looked like a potted plant with dirt.  It was really neat.  (just a side note!)
b.  Beach cups.  Here are two versions of them.  The first one is made with Vanilla pudding and blue food coloring, whipped cream with Oreo's in them and then sweetish fish on the top.  Layer pudding, whipped cream, etc until pudding is on top and then put your fish in.
  b2.  The second version is made with butterscotch pudding, blue colored sugar, crushed up graham crackers, part of a fruit roll up (the towel under the teddy graham), a life saver, teddy grahams and fruity gummies.  Top it with the little umbrella.  You should either be able to make a bunch of them at once or have plenty of left overs for another time!

4.  Go on a Scavenger Hunt

  Everyone can get empty toilet paper rolls pretty quickly.  Just make sure everyone in your family knows to set them aside until you have the amount you need for your binoculars, 2 per child.  These are so easy to make, just glue the 2 rolls together along down the middle, long ways. Use a hole puncher (or pair of scissors) to poke a hole on either side of the rolls.  Finally attach yarn, or string, or ribbon through the holes punched so they can hang on the child like a necklace.
  Have the kids write down what they think they will see on their adventure, or maybe pick out 10 things you think they should find.  Give them the paper and a pencil and go exploring.  You could take these to a zoo or botanical garden to the kids can "see better" or find more things through them.  They will have a blast.


5.  Make Healthy Treats
a.     b.   
   a.  Apple Cars- These are incredibly easy to make.  Just slice an apple into medium sized slices.  Cut grapes in half and attach one on either side of the front and back of the apple, attaching with a toothpick.
  b.  Apple Mouths-  Again, slice your apple into thin slices.  Spread peanut butter on the insides of 2 slices.  Attach marshmallows to one apple slice and then top with the other peanut buttered slice.

6.  Make some 4th of July treats
a.
b.

a. 4th of July Popsicles
These take:
1 Cup Cranberry Juice
1 Cup Lemonade
1 Cup blue Sports Drink (Gatorade, Powerade)

1.  First put Cranberry juice at the bottom of a small cup and freeze until almost firm (about 1 hour).  Place popsicle stick in .
2.  Next, fill about 2/3rds of the way up with Lemonade and let freeze.
3.  Finally, fill the remainder with the Blue Sports Drink and let freeze.
4.  Pull out of the cups and enjoy!

b.  4th of July Pretzel Rods
  With these, simply dip the ends of the pretzels (I like half way), with melted white chocolate, white almond bark, or dipping chocolate.  Immediately cover with your Red, White, and Blue sprinkles or colored sugar.  Let harden and then eat.
**One trick with dipping things like pretzels or strawberries, put a small amount of vegetable or olive oil in the chocolate until it runs off your spoon smoothly.  It should be about a tsp or less, but it just helps cover things easier and with no clumps.


7.  Movie Mania
File:Madagascar3-Poster.jpg

  Of the 3 areas I have lived in since I had children, each have had a Summer Movie Program.  Basically, they will have a movie each week that is an older movie, but it will only cost between FREE and $1.00 per person.  Some areas, like Birmingham, have more than one movie option, maybe something rated G for the youngest kids like Hotel Transylvania, and something PG for older kids like Alvin and the Chipmunks- Chipwrecked.  Some of the different theaters would even be playing a different movie in different locations, so see what you would like to watch the most.
  This last week, we got to watch Madagascar 3- Europe's Most Wanted.  This week it will be The Lorax.  This keeps you busy at least one day a week.  If your area has more than one movie, you could go multiple times that week.  If you don't know if your theater does this program, google your area or ask friends!

8.  Balloon Games
a.   b.  c.  

  a.  Water Piñatas.  Just find some waterproof toys to put inside the balloons for prizes and hang the balloons up throughout your yard.
  b.  Balloon Race.  The object is to see who can get the most balloons into their basket only using pool noodles.  You can have a time limit if you want, but do not have to.
  c.  Balloon Horseshoe.  The picture shows where they have put a point value on each balloon.  You can either do that or maybe a set amount for each balloon.  Using helium in the balloons, tied them around in various parts of your yard.  Use a hula hoop to toss over the balloons to collect your points.

9.  Ball Games


  a.  Kid Croquet.  For this one, cut hula hoops in half and spread them throughout the yard for the "wickets" or hoops.  Use medium to large bouncy balls or kickballs.  If you do not have flags already to use, you can make some very easily with a dowel and felt or left over pieces of material.
  b.  Good old fashion KICKBALL!!  Get a group of friends together and get a small bouncy ball or kickball.  We just did this with some friends last week and had so much fun!  We even had two 3 years olds and it worked perfect for them too.

10.  Playgroup

  Depending on your area, you will need to figure out what will really work for you all.  For instance, right now here in Phoenix, it has been 112-114° for the past several weeks, so a playground Playgroup would be pretty much out of the question, even early in the morning.  We do have some covered playgrounds, so those ones might work.
  Another possibility is to go to a splash pad.  Of the 3 areas I have lived in, there have been several FREE options to choose from.  There are also paid ones, but why pay when you can go to a free one?  If you don't already know of one in your area, google it or ask around to people who have lived in the area longer than you.  You should be able to find some good options that will work for you and your friends.

Hopefully this has given you some fun options to keep you busy with your kids this summer!  
Hope you enjoy!
~The Sissies~

Monday, June 17, 2013

Father's Day Dinner


I wanted to make a great dinner for my husband yesterday for Father's Day.  I know I have already posted the "Star Jones Lobster and Steak dinner," but I wanted to make it again for him and it turned out great.  My 6 year old loved the lobster so much, he ate 2 whole tails!  He kept saying over and over how good the lobster was too.  It kind of made my day!

The rolls are the recipe Michelle posted a while ago that I finally tried.  Click here for the link.

Grilled Green Beans
As for the green beans, this was the first time I tried them on the grill this way and they were AMAZING!!  I wish I had made more.  
1.  All I did for those was pull out about 2-3 cups of frozen green beans and put them in an 8X8" glass dish.  
2.  I put 1 tbsp of olive oil over the top of them and made sure they were all covered with it.  
3.  Then I salt and peppered them.  
4.  Finally, I just put them on the grill when I put the steak out there.  I left one of the burners off and just placed the pan over that burner so they weren't getting direct heat.  I stirred it when I turned the steak over and took them off just prior to taking the steak off the grill.  DELICIOUS!


Strawberry Cheesecake with Sour Cream Topping

My husband loves cheesecake and I have tried a homemade recipe before and quite frankly, it was gross.  That is the reason I have always just done them from a box--they turn out everytime and they are good.  Well, I found this recipe in the July 2013 Issue of "All You".  I just had to try to make another homemade cheesecake again.  Turns out, it was Delicious too!  We all liked it.  So here is the recipe.

16 oz. Cream Cheese at room temperature
1 Cup Sugar
3 Large, lightly beaten eggs, at room temperature
2 tsp. Lemon Juice
2 tsp. Vanilla Extract
1 9-inch prebaked Graham Cracker crust
1 1/2 Cups Sour Cream
1 pint of fruit of choice

   1.  Preheat oven to 350°.  In a large bowl, beat cream cheese and 3/4 C Sugar with an electric mixer on medium until smooth.  Add Eggs, Lemon Juice, and 1 tsp Vanilla; beat until blended.  Pour into crust.  Bake until edges are set and center jiggles a bit, about 30 minutes.

   2.  In a medium bowl, stir Sour Cream, 3/4 C Sugar, and 1 tsp Vanilla.  Remove cheesecake from oven; let cool 5 minutes.  Spread Sour Cream mixture on top and return to oven.  Bake until topping is firm, about 15 minutes.  Let cool 20 minutes on a wire rack, then cover and chill 4 hours or overnight.

   3.  If desired, place half of the berries of choice in a medium bowl, sprinkle with 1 tsp Sugar and lightly mash.  Let stand 10 minutes.  Serve over cheesecake.

More recipes like this can be found at All You.

Graham Cracker Crust
If you don't have a Graham Cracker crust on hand, you can easily make one by combining a package of Graham Crackers- crushed, 4 Tbsp of Sugar, and 4 Tbsp butter, melted.  It should be soft and kind of clumpy.  Mash it around the sides first and make sure they are covered, then mash the rest down on the bottom.

Wednesday, June 5, 2013

Rhubarb Dump Cake


When we were growing up I remember every year for Father's Day my Mom would bake my Dad a Rhubarb pie. He LOVED rhubarb pie!! Now that I am all growed up, I love  rhubarb too! I love to make rhubarb crisp, rhubarb/strawberry pie or crisp and this delicious rhubarb dump cake.  This is my children's favorite rhubarb recipe, so I thought I would share.

Rhubarb Dump Cake

1 lb rhubarb, cut into 1/4" pieces (between 4-5 C.)
1 C. white sugar
1 (3 oz) strawberry jell-o
1 package yellow cake mix
1 C. water
1/4 C. butter, melted

Preheat oven to 350*.  Grease a 9x13 baking dish. Spread rhubarb on the bottom of the baking dish. Sprinkle sugar over the rhubarb, followed by the jell-o, and finally the cake mix. Pour the water and melted butter over the top.  Do not stir.  Bake 45 minutes or until rhubarb is tender.


Hope you enjoy!!
~Rachel~

Tuesday, May 28, 2013

Father's Day Tie Board

We've added one more item to our shop just in time for Father's Day! You can check it out here!


Monday, May 27, 2013

Happy Memorial Day

  I hope we can all take a minute today to remember those who made it possible to live where we live, love who we want to love, worship how and where we want to worship, and all of the MANY other freedoms we are so blessed with. I know many of us will have the day off today and be able to spend time with friends and family for fun and food, but please don't forget what makes this day so important. Here are a few photos to help bring in that spirit of remembrance and thanks!

 
Arlington Cemetery in Washington DC.  If you have not been here before and ever get a chance to go, TAKE IT.  It is a remarkable place to visit and the feelings you have there are so amazing!


These next 2 photos touched my heart so much.  I am so thankful for the men and women who have sacrificed their lives so we can have our freedoms.  It was not only the soldiers who sacrificed, but their families.   Let us remember them all today!


Sunday, May 12, 2013

Happy Mother's Day!!!

I saw this video the other day and it is adorable! It made me a little teary eyed. So I thought I'd share it for all of you fabulous women out there on this special day!! Hope you were all spoiled today!!! Happy Mother's Day from the sisters!!


It is worth it, I promise!

Saturday, May 11, 2013

How to fix a Bowed Shelf

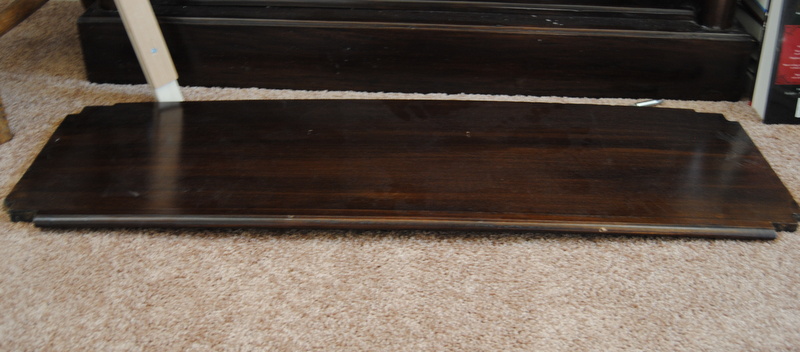
  Maybe this is a weird thing to post about, I am not sure, but maybe it will be useful to someone else!  I had this shelf I had purchased from a furniture store that I absolutely LOVE.  It is a beautiful cherry wood color, simple but beautifully crafted, at least in my opinion.  It was perfect except that within the first few months of having it with my books on it, the shelves all started to sag.  I don't know if it was just my luck or not because the store had the exact same shelf with lots of heavy books decorating it and they were not sagging, so who knows.  Anyhow, it has been like this for a few years because I was just not completely sure how to fix it, but I knew I wanted to fix it and not throw it away.  So with a little inspiration from my mother-in-law and some help from my friends at the local Home Depot, I have FINALLY been able to fix my shelf and it is working AMAZINGLY well.


I don't know if you can see the bowing in this top picture as accurately but it was the best one I could find with books on the shelves.  It was from about 5 years ago, right after we got it.  The picture down below is one of the shelves turned upside down and you can really see how badly it is bowed.  It should be lying flat on the ground!


Here are the steps I took to fix my shelf:


****I am going to make this note right here and it goes for all of the pieces you need.  Whether you purchase your wood from a Home Depot, Lowes, or other wood supply store, if YOU do NOT have a saw at home, just ask them to cut the pieces to the length you need.  They are SUPER nice and willing to help like that!  Just bring your measurements with you!  Make sure to measure at least 2x's to get it right!

1.  I measured underneath each shelf from side to side, inside the framing and purchased 1" X 2" boards that would be the supports on the inside, back of the bookcase, underneath the shelf.  As you can see, I also had to purchase 1/4" X 2" piece of wood also that is a little shorter than the 1" X 2" because of the way the framing is, otherwise there would have been a 1/4" gap between the back and my support piece of wood.  You may or may not need this additional piece.  
  a.  If you DO need this piece, mark on your 1" X 2" the left and right sides of the framing that are vertical so you know where to attach the 1/4" piece.  For example, on my bottom shelf, the left side vertical piece was 2 1/4" in but the right side was only 2".  I marked those lines so I could glue and attach my wood right there.  Once it was dried, the piece fit into the back perfectly!
    b.  Once your sides are marked, (I would also mark L and R just to keep them straight, and mark both pieces of wood for which shelf they belong to) apply wood glue to the 2" part of one of the pieces of wood and put the two together.  (Make sure the 1/4" is on the back side with L on the left side and R on the right side!)  
     c.  Then you will C-clamp the pieces tightly together using a piece of cardboard or something similar to protect the wood from indentations.  
      d.  Once C-clamped, screw together using FLAT head, 1/2", wood screws.  Let it sit overnight or several hours until the glue is nice and set, then move on to the next one.


2.  For this step, you will want a nice firm 1" X 2" pine or hard wood.  Something that should be very stable for it.  This one does not have to be the exact length of the shelf. Mine was about 2" short of the entire shelf length.  
I took the piece I made in step one, and one of the pieces of Pine I had cut and on the BACK, UNDER side, I lined this up to match the indents of the shelf with the PINE piece in the FRONT.  It should be about  1" short on either side of the piece from Step 1.  
   a.  Put wood glue (in small dabs) on the 1" side (facing the shelf) of the PINE piece and put back in place.
   b.  Put your cardboard piece on the top part of the shelf (the part touching the ground) and start attaching the C-clamp just to the PINE piece while making sure to keep everything lined up.  The wood piece from step 1 should remain flush with the shelf at all times or you will need to readjust.  If you let it dry overlapping the edge, it will not fit into the bookcase.


   c.  Once you have the first side C-clamped, C-clamp the second side and you will start to see the curving straighten out.  
d.  Wipe off any glue that got smeared or squished out and remove the piece from Step 1.


3.  Turn the shelf over and measure how far from the end your piece of wood is now glued.  For example: my Step 1 piece brought my Step 2 piece out 1 1/4".  If I measure between 1 1/2" and 1 3/4" in, my screw will be attached great.  Do the same from the side end and mark where they cross.
b.  Once you have both ends marked, measure the distance between those 2 marks and divide it by 3.  Mine came out to 11 inches, so I marked the 2 middles screws 11" from the 1st and last screws, 1 1/2" from the back end.  Screw these in with 1 1/4" FLAT head, wood screws.
c.  Again, let this set over night or several hours until the wood is good and dry!


4.  This step has 2 options.  If you don't care about appearances on the front, don't follow this part.  If you don't care about appearances on the back, follow this step!  Take your Step 1 piece to the bookshelf and fit it to the framing.  Turn it sideways so you can see the screws and the back of the bookshelf.  Mark 4 spots (similar to Step 2) where you can screw all 3 pieces through the back.  Approximately 2" from the L side and R side, and then 2 evenly in the middle.  Just make sure you will not be hitting the screws in the board of Step 1.  (this is why you are turning it sideways).  Once marked, drill a small pilot hole through the back of the bookshelf.

5.  Once you have screwed the Step 2 piece to the shelf, you can put the Step 1 piece back into the bookcase framing.  Line it up with the side framing where the shelf will go.  It doesn't have to be perfect yet!

6.  Once you have completed Step 3 and your shelf is dry, and you have completed Step 5, place the shelf back onto it's support frame with the new one in place.  Once it is in there, look underneath.  If your Step 1 piece is not flush with the bottom of the Step 2 piece, either take a scrap piece of wood or a hammer and GENTLY tap it into place.
b.  Do this with all of the shelves.

7.  Move the bookcase out so you can screw your finishing screws into the backside.  You will use 1 1/2" FLAT head, wood screws for this.  Just line them up with the pilot holes you already drilled and you are set. Sorry that I am messing up the back of your shelf but they are usually against a wall, right?  You can always cover them with the little plastic covers if you want.
a.  Second option if you do not want to go through the back, just go ahead and drill your 4 support screws through the front side, going through the PINE wood first.  Again, you can always cover with the plastic screw covers or the wood plugs.


8.  Finally, find a stain that matches your shelf color and stain away.  I just used a little foam brush and it worked great.  The front side required about 3 coats, but it dried really quickly.


  It was kind of a long process because I only had 2 C-clamps, but I definitely think it was worth it!  My shelves are perfectly lined up and my books actually go straight across now!

~Stacy~


Friday, May 10, 2013

Honey Lime Chicken Enchiladas


Honey-Lime Chicken Enchiladas

1/3 C. honey
1/4 C. lime juice (about 2 large limes)
2 tsp. to 1 Tbsp. chili powder
2 cloves garlic, minced or 1/2 tsp. garlic powder
1 lb boneless skinless chicken breasts, cooked and shredded
12 corn torillas
2 C. mexican cheese blend, shredded
1 14 oz can green enchilada sauce
1/2 to 3/4 C. heavy cream

Preheat oven to 350*. Place the cooked/shredded chicken in a medium bowl, set aside.  In a small mixing bowl combine honey, lime juice, chili powder and garlic, whisk together.  Pour over chicken.  Allow it to marinate in the refrigerator for up to an hour.  

Heat a large griddle until a frop of water skitters across.  I add a little oil, and I mean a little, in between each tortilla.  Heat the tortillas for 15-20 seconds on each side, until they are flexible, they can have a golden spots on them. Have a cookie sheet lined with paper towels and place the warmed tortillas in between the paper towels until ready to use.  
Mix the enchilada sauce and heavy cream together.  Spread about 1/2 C. on the bottom of a 9 x 13 baking dish. Add a large spoonful, about 2 Tbps. of chicken to each tortilla.  And a tablespoon or so of cheese and roll up.  Place the enchilada seam side down in the baking dish. I line them up so I have two rows, spreading across the 9" part of the pan.  Repeat for all remaining tortillas, chicken and cheese (reserving some cheese to add to the top).
 Add any leftover marinade to the cream mixture.  Pour over the top of all the enchiladas.  Sprinkle with remaining cheese.  
Bake enchiladas for 30-35 minutes, until the cheese is melted and bubbly. 

This is seriously one of my family's favorites.  There are never any leftovers, sadly. We usually serve it with lime-cilantro rice, black beans, and chips and salsa.

Hope you enjoy!  
~Rachel~

Friday, May 3, 2013

Your Love Bucket


 I have been contemplating some things I can do to strengthen my marriage and relationship with my husband because, lets face it, relationships can be hard and if you don't work on them, like anything else, they will fade out and die.  That is not something you want to have happen to a relationship you obviously have invested yourself in, or you wouldn't be married, have children with, or whatever the case may be, right?  I have also talked with one of my sisters and a friend very recently who have also been having these thoughts so I figured there may be others too who are sharing these feelings.  I really love Michelle's idea about keeping the notebook throughout the year and writing in all of the reasons they make you laugh or make you happy, but, let's face it, if you only give it to them once a year, there are 364 other days you may not be expressing those feelings and appreciation to them.  So here are some ideas for you to do on a monthly, weekly, or even daily basis to help strengthen your marriage and make things fun again!

1.  Leave little notes for them to find letting them know you appreciate what they are doing for you: working to provide for your family, mowing the lawn, taking out the garbage, washing your car, helping with dishes....whatever they have done to help you.

2.  Put "Conversation Hearts", stick-figure pictures, or other little notes in their lunch letting them know you love them, or giving them something to look forward to when they return home that night!

3.  Try reading the book, "The Five Love Languages" by Gary Chapman.  This should help you figure out what your spouses "Love Language" is so you can help "fill their Love Bucket".  (Borrow it from the library, most will have a copy of it!)  These are: Words of Affirmation, Quality Time, Gifts, Acts of Service, and Physical Touch.  Most people have one or two very apparent ones and if you don't know how to speak in this language, they may not feel your love for them, have a hard time expressing it to you, and make your relationship difficult!


    Here is an example.  My Love Language is very much Physical Touch, but my husbands is Acts of Service and Gifts.  He would much rather have the house clean and dinner started instead of a hug and kiss when he gets home, and I am the opposite.  It took me a really long time to realize this.  I can always tell a big difference when I have the house cleaned up and his attitude than when he comes home to a dirty house and cereal for dinner!

4.  Do something they like to do.  Relationships are about 2 people, not just one, so we need to learn to be unselfish and compromise.  This may be something as small as letting them choose the movie you will watch or which restaurant you will go to.  Try doing something they like for a date every once and a while too.  For instance, my husband really likes to play the Playstation 3 and I am not a big fan, however, I think playing with him for a date would be fun.  Now, I will put limits on it like the shooting games but anything else would be fair game and fun.  Try finding the thing you can do that he likes and you might blow his mind!

5.  A Service A Day.  I have always heard as I was growing up, that you will love those you serve, and if you don't like someone,start finding ways you can do service for them and you will learn to love them.  I have seen this over and over with my all of the people who have become my best friends.  It can be the same way with your spouse!
   We tend to get in ruts with them and just do the same things over and over and it can become feeling like a duty or obligation, when really it is a choice to do nice things for them and serve them.  Try looking for one nice thing, above and beyond what you normally do to give service to them once a day.
  For example, my dad makes my parents bed every morning.  He loves doing it and I think is secretly proud at how good he is at making it.  I think if my mom were to quickly make the bed one morning every once in a while he would notice it as something nice she did for him that day to say thank you for always making the bed.  Now, if she were to do it every day for him, he might start thinking she doesn't think he can do it good enough for her and take offense, so you need to think of something different every day!
  One more example and I will move on.  My husband doesn't really like to mow the lawn and I really don't mind it, but have PLENTY to do inside the house.  Every once in a while, I know he is busy or tired, so I will just spend a little bit of my inside cleaning time to mow the lawn for him.  I figure it is kind of a toss up because he likes the inside cleaned too, but would really rather not be mowing the lawn himself.  Just be creative and have fun.  Don't be offended if they don't notice your service, it is meant to be service, not jobs for pay!

6.  Go on Dates.  Yes!  This is still extremely important!  What did you do before you got married that got you to fall in love with this man?  You were probably going out with him, seeing him out in all different settings and having fun with him.  Dates help you get away from the stresses and pressures that are at home.  Please try to remember to keep work, money, kids, and all other home problems at home.
  Budget for this so it can be a reality.  Dates don't have to be expensive either...sometimes the funnest ones don't cost a thing!  Decide what is financially possible for you, but make it a must.  Do a babysitting swap with a friend who has kids if you need to, to help make it possible to have your date night!
    Here is a link to some dating sites or ideas:
          Stay At Home Date Night
          In House Date Night
          Impress Your Man
          Book Date
          The Dating Divas
          Love Actually

7.    Another book to try.  I would suggest buying it because you rip out the pages and I would doubt the libraries will have copies because of this!  Once you rip them out though, you can always put the his and hers into ziplock bags and do them again later.  The book is called, "101 Nights of Grrrreat Romance," by Laura Corn.  This has 101 different dates to go on.  Every other one is his, then hers.  They range from little to no money, traveling to a destination (dinner) to staying at home, and so on.  Each week (or how ever often you two decide you will date), one will decide which page to rip out and then follow the instructions for that date.    You can modify it a little if you need or like, but all of the instructions and things you will need are right there. It is a lot of fun, especially when you are both participating in the planning.  I know how NOT fun it is to be the only one to plan date, get the baby sitter. . .


8.  Try a NEW nightly ritual.  By this, I mean more than just saying "I Love You", although that is VERY important.  Everyone needs to hear and know this, EVERY day.  Here are 2 examples of what I mean by this and you can come up with your own if you don't like them and/or have something different!
   I was reading one from "The Dating Divas" that was really cute I would like to try myself.  She said every night before they go to bed, they say, "I love you today because. . ." and then proceed to say a reason why.  It could be something they did that very day, something in general, or something that has previously happened that has been on your mind.  Another reader said their version of this is on a small white board.  Every morning, he writes his reason on the board and hangs it on the fridge before going to work so she can see it when she wakes up.  She will then write her reason while he is at work and leave it on his pillow to find that night!  How cute!  I love it!
   My other idea comes from my son.  For the past few years, he and I would take naps together, a lot, because he wouldn't go to sleep well at nap time once he was first sleeping in a big bed.  I was totally okay with that because I LOVE naps!  So, he started turning towards me and asking if I would hold his hand while he fell asleep.  We would just hold right hand to right hand and both fall asleep like that, facing each other.  It was so sweet and I LOVED it.  Then, he went to kindergarten and I was so sad to lose that with him.  I told my husband we needed to start that at night because I just felt like that was such a connection I had with my son, it would be awesome to have with my husband, falling asleep face to face, hands joined every night.  He is not totally sold on it, and we have only done it a couple of times, but I am working on him.

9.  Get them random gifts or treats.  Maybe not everyone likes to be given things, but I really haven't met that person, have you?  You don't have to spend much money at all.  When you grocery shop, just think of their favorite candy bar, gummy treat, or chip, and buy that especially for them.  Buy them a $5.00 movie you think they would like, wrap it up, and just out of the blue give it to them or leave it under their pillow to let them know you are thinking of them.
  My husband apparently likes rye bread.  I didn't know this until last year when I heard him telling one of our friends, so I have been making it a point to buy a loaf of rye bread to send with him for his sandwiches in his lunches.  No one else gets the bread, I just keep it in the freezer and only pull out the slices I need for that day.  He also likes gummy bears, so I just bought him like 2 pounds of it yesterday so I could surprise him with them and send some in his lunch as well.  Maybe it won't mean a thing to him, but maybe it will make his day!

10.  Do things for him you want him to do for you.  I am not talking about manipulating him!  I am saying this.  A while ago, I was feeling down because I hadn't heard I looked nice, or thank you, or whatever else you start feeling when you are down, and then it dawned on me that I hadn't told my husband he looked nice in a long time either.  I hadn't told him thank you for going to work every day for us, or thank you for providing food and a home for us.  I hadn't been being as kind and caring as I was wanting him to be being either.  It really made me start thinking about the things I was saying and doing too.  I can't expect him to be full of compliments and thank you's when all I am doing is complaining and nagging, right?
   If you want him to be opening doors for you, try opening his door for him when you are inside the car.  Offer complements and gratitude daily.  Be respectful and kind.  As the golden rule states, "Do unto others as you would have them do unto you!"

Hope this helps brings some spark back into your relationship!
~Stacy~


Monday, April 29, 2013

Hurry, Only 2 Days Left!

   Don't forget, there's only 2 days left to get 10% off anything in our Shop!  Just enter SHOP10 at checkout (with a minimum purchase of $12.00).  Another look at some of the item:


Sunday, April 28, 2013

Spiritual Sunday

Here is an uplifting video called "Mountains to Climb" I loved and have wanted to share for a while.  Hope it will lift someone's spirit today and encourage you to keep going!


~Stacy~

Wednesday, April 24, 2013

Spring Cleaning- Inside Edition

  We are all getting so excited for SPRING and the warm weather it brings!  We realize it is already warm (Like 90's already in Arizona--Stacy and Michelle), warming up in other places like the South, and still cold enough to be snowing (Like the sisters in Idaho and Utah last week!), but most of us have been itching to do some spring cleaning.  We have been sharing ideas with each other for what we are doing, what we have done in the past, or what we would like to try this year.


WHOLE HOUSE
*  This is one I am going to do for my grout!  Using 7 cups of water, 1/2 cup baking soda, 1/3 cup lemon juice, and 1/4 cup vinegar you will spray this combination onto a small area your grout at a time.  Let it sit for a few minutes, then scrub.  Have a bucket of warm water and a cloth with you so you can rinse your scrub brush out and wipe up the dirt you scrub up.  It will also leave a residue, be ready to do a light mop after.  (It really does work and will amaze you how much stuff comes up from it).


Before


After


*  Vacuum window blinds and curtains.  Some curtains you can even wash in your washing machine once in a while to avoid getting a large dust build up on top of and down them.  (Especially important for those with allergies in the home!)

*  Wash windows inside and out.
          -For the inside, after washing go over again with a newspaper to diminish streaks. 
               ~Another idea is to dry horizontally inside and vertically outside  (or vice-versa) so you can    
                 see if you had streaks on either side or if one side needs more cleaning.  
          -For outside, we recommend using a bucket of soapy water and a squeegee.  Use either a cloth to  
           wash the window or a squeegee like you would use to wash the car window.  To dry, however, 
           use a straight squeegee like this:  Unger 12 in. Stainless Steel Window Squeegee with Rubber Grip and Bonus Rubber Connect and Clean Locking System
           Something like this can be purchased at Home Depot or similar for around $10.00 but will last a
           really long time.  This will keep the streaks from forming and your window gleaming!

*Dust top to bottom.  I have one of the "feather duster" type dusters that can extend it's arm out and I go from top to bottom in every room, getting all corners (with spiderwebs) clear down to the floor.  After I do this through out the whole house I vacuum thoroughly and then clean the carpets and couches.

*Check and change batteries in smoke detectors.

*Wipe down walls.  Again, I take a bucket of warm water and vinegar and a rag and go from room to room wiping down all the walls.

*Light switches.  I am sure that you all have the same problem I do with the light switches, maybe not, but mine get all gross and grimy.  I give my kids Clorox Wipe and assign them a section of the house.  They then clean the light switch and all around it.  There is always so much dirt and grim around them when they are cleaned it looks like a totally different light switch!  Gross!!  (Do the same thing with door handles.  Kids also like this job.)

*Clean baseboards.  This is a great job for the kiddos.  I fill an ice cream bucket with warm water and vinegar an old sock and a section of the house.  They think it is pretty fun (now).
       *** a little tip*** When socks get a hole in them, keep them.  They are great cleaning rags.  I slip one over my hand and go to town dusting.  I also use them for almost all of my cleaning projects ... cleaning the bathroom sinks, baseboards, walls, chicken eggs.  I have an ice cream bucket that I keep full of them and replace when they start looking yucky.

*Take rugs outside and beat with a broom handle.  You won't believe the dust and dirt that comes out of them!!


LIVING ROOM

*  Wash your couches.  If you have a cloth couch that has removable covers for the cushions and you feel comfortable, you can try running them through your washing machine.  I would suggest only trying one on the delicate cycle.  (Stacy tried this with her extra cushion first to make sure it would not ruin it before trying the rest of the couch).  If you are uncomfortable trying this, you can us a steam cleaner with the hose adapter.  Do not try this if the couches are made of micro-fiber or leather!
         -You can also wash the throw pillows for the couches with cloth material.
         -This always makes the couches look and feel fresh and they smell GREAT!
If you have leather couches, this is a good time to apply the leather conditioner.  I also go and apply it in my vehicles at the same time.
*  Steam clean your floors.  It is always good to do this in the spring and fall.  If you don't have a steam cleaner, you can always rent one for very cheap at most stores like Walmart, Target, Home Depot, Lowes, etc.
           -Try spraying Oxiclean pre-wash on the big stains prior to cleaning
           -Also, either use one of the cleaning products with Oxiclean added or add about 1/4 scoop to
            each load of water/cleaner.


KITCHEN
*Deep clean Fridge and Freezer.  This is a great time to defrost your freezer too before you start stocking you on the great fresh fruits and vegetables that will be ripe soon!
*Deep clean your stove top and oven. I usually pick the first nice day outside to do this.  That way I can open my windows throughout the house and the smell from the cleaning will blow out.  Plus, my oven tends to set off the smoke detectors if the windows are not open. (I guess I would know if my smoke detectors were working or not)
*Clean the fronts of the kitchen cupboards and the hood for the stove.
*Clean and organize pantry.


BATHROOM
*Clean out and organize medicine cabinets.  Throw out all medications that are expired (or empty that you just kept the bottle for sentimental reasons, right?  Why else would I have 5 empty childrens' tylenol bottles in there???)
*Organize bathroom drawers.  No matter how hard I try to keep them neat and organized, they always get messy.  Throw out anything you don't use.
*Wash shower curtains.  I like to buy the shower curtains that are fabric and washable.  If I have a liner I usually replace it in the spring (after I have deep cleaned the shower).

BEDROOMS
*Organize kids closets.  I do this 2 times a year, once in the spring and once before school starts.  I have a donation box and a tote for all nice clothes to pass on to siblings or cousins.  We pack away anything that does not fit and make a list of things we may need to get for the upcoming season.
*Organize my closet.  That is not as much of a task as the kids, but I do try to get clothes out of my closet that I don't wear or like anymore.  I also go through mine and my husbands t-shirts and such and refold/make them look nice. (mostly my hubby's, he is not so neat when it comes to his clothes)


Now we know that this is not going to get your whole house, because everyone has different homes, but this will at least get you started.  Make yourself a list of things you would like to accomplish and get to work.  Do one Spring cleaning job a day (or more if you catch the spring cleaning bug) and you will have a sparking home in no time!!

After you have your home all clean here are some tips to keep it that way.

Some more great tips can be found at this website.

how to fake an immaculate house

~Rachel~
Related Posts Plugin for WordPress, Blogger...