Wednesday, February 27, 2013

Kicks && Giggles


Here is how not to curl your hair... 


I am sorry for the girl, but this video is hilarious!! I died laughing.  For the future, don't hold it in for "20 seconds...or longer".  Probably not the best idea! Haha too funny!
Hope you enjoy!

Melanie

Monday, February 25, 2013

White Chocolate Popcorn

I, like Rachel and her family, also love popcorn! One of my favorites has been this caramel popcorn. A few years ago when we lived in Rexburg we had a New Year's Eve party with Meagan and John and Meagan made AMAZING popcorn...and ever since then I will get these random cravings for the delicious White Chocolate Popcorn. And the best part...it is so easy to make!

You will need:
Almond Bark
Popped Popcorn
Sprinkles (optional...but make it pretty)


All you need to do is have your popcorn popped and then I used 4-6 squares of the almond bark for a big bowl of popcorn. (2 bags of microwave popcorn, or if you use airpop then 2 or 3 batches)
Then, melt the chocolate for 30 seconds, then stir and repeat until it is all melted, and pour over the popcorn and add your sprinkles! I usually let it sit for a little bit so it gives the chocolate time to set.
Then enjoy!!


--Michelle--

Friday, February 22, 2013

DIY's for your house, ANYONE can do!


  The past few months have been very busy and challenging for my family as we have been getting ready to make a big move across country.  If you could not tell by some of my postings (cheap house updating--painting and such), we were getting ready to put our home on the market, hoping to sell quickly in a very slow market.  I needed to make sure it looked its very best before we listed it.  If you have never been house hunting before, let me just say, it would amaze you how many people do NOT do this and it is a HUGE turnoff to their homes being sold.  Everything I did to get the house ready cost less than $1,500 to get looking as close to a a model home as I could and we did end up getting more than we paid for the house!  I hope that goes to encourage anyone debating whether it is worth it or not.  We only hired out for one part of the 2 month process and that was painting up a stair case with up to 20' ceilings.  That one was worth paying a professional who had the correct equipment to do this instead of break our necks trying!  Anyhow, long story short, here are just a few more do it yourself things to help fix or spruce up your place to just enjoy your home more or maybe get it ready to sell.  We are coming up on spring and summer which are the hottest times to sell you house.

This first clip is how to fix nail pops you might find on the walls or ceilings.  We had a lot of them I had to fix, but they are super simple.  All they require is a hammer, putty, putty knife, sand paper and then paint to go over it with after the patch.  You can buy a wall patch kit at any store that sells home improvement supplies for roughly $7-10.00.  They will often have the little sander in them with the putty and knife as well.  As shown in the video, all you have to do is:
1.  Hammer the popped nail back in
2.  Use the putty knife to rub of any extra dry wall
3.  Patch the hole with putty and wait until it dries
4.  Sand flat
5.  If it is on the wall and you have texture, you can purchase a texture canister at the home improvement stores to match the texture and spray.  Let dry
6.  Paint over with flat paint
7.  Paint over again with the color of the wall or ceiling.


***TIP*** I really do love to pain and I have learned a few tricks.  One thing I have recently learned is when you do patch holes or touch up areas with putty, after you have sanded the area down and applied texture if needed, apply a flat paint before you put on the matching color to the wall.  This will help avoid the glare of the sheen you can often see afterwards if you have painted with a satin (eggshell).  Amazing trick that works really well!!!


  Another thing I had paid to have done when we moved last time was have someone repaint all of my trim and doors.  I had already painted the walls but thought the baseboards and doors was too much for more.  I paid the man about $600 and he was there for about 2 days.  I watched what he did and it looked incredibly easy.  The outcome was AMAZING.  The house looked so good and we ended up selling the house in only 4 days, again making a lot more than we paid for it!  Well worth it.  So when I was getting this home ready to put on the market, I thought I would give it a chance.  I bought 2 gallons of the trim and door paint from Sherwin Williams (no color added).  I watched for a coupon.  They often have 30-40% off coupons.  The paint was about $26.00/gallon. I used my great trimming brush and a really big putty knife, started in one room and worked around until I had completed the whole house.  I used the putty knife to hold the carpet down so I wouldn't get paint on it and it worked great.  Again, the finished product was FABULOUS!!  A bright, crisp white against all of the other colors I had painted in the home.  I loved it!  Here are some before and after pictures of the baseboards.

Baseboards before painting them

Large putty knife tucked under the baseboard, ready to paint.

Same wall after trim painted.

Kitchen wall after trim and baseboards painted.

   Another thing that is super easy and cheap to do and helps add a lot to your kitchen is accessories above the top cupboards if you have them.  This is really inexpensive and if you have a Hobby Lobby, or Michael's near you, watch the papers or print a 40% coupon each time you go in and you will never pay full price for any of the decorations.  Get candles and holders, pictures, clocks, greenery, fancy vases, baskets in a variety of sizes anything you would like to look at.  To get different heights on things, use old books or containers to lift things above to a good viewing level.


Just get a variety of things so it doesn't look all the same and it will add a lot to your kitchen!  
Have fun!!

~Stacy~


P.S. Don't forget to check out our Shops "Item  of the Week"!

Wednesday, February 20, 2013

Monterey Chicken Fajitas

Feb


I got the opportunity to live with my Mom's parents for a few months when I was 20.  It was then that I learned where my Mom learned to become such a good cook.  I have always loved my Mom's cooking and living with my grandparents was not only fun but delicious!  My Grandma is such a good cook!!  When each of us gets married we are blessed with a family cookbook made with love by my Grandma!!  All of the recipes are tried, true and DELICIOUS!!  Anytime I want to try something new I always pull out that cookbook first.  
One of these recipes we love is Monterey Chicken Fajitas.

Monterey Chicken Fajitas

2 Tbsp. Vegatable oil
1 medium green pepper, cut in strips
1 can cream of mushroom soup
1 lb. boneless skinless chicken breasts, cut into strips
1 medium onion, sliced
1/2 C. chunky salsa
1 C. shredded Monterey Jack cheese
8 flour tortillas

Heat oil in skillet.  Add chicken and cook until browned, stirring often.  Add pepper and onion and cook until tender-crisp.  Add soup and salsa and heat through.  Spoon about 1/2 C. chicken mixture down the center of a warmed tortilla.  Top with cheese and additional salsa.  Fold tortilla around filling.  Serves 4.

~Rachel~

Friday, February 15, 2013

Sashay Scarves

NEW ARRIVALS!!!  FREE SHIPPING and Introductory Price!!


These are such cute, fashionable scarves.  They come in many colors and are available in adult, child, and infant sizes.  Our introductory price will be as follows. . .

Adult sizes---$20.00
Children--$15.00
Infants--$12.00

**All introductory prices will include shipping.  This is for a limited time though so order now!!  Please allow 3-4 weeks for shipping and handling.  We hope you'll like them as much as we do.


This is Boogie-- It's Purple one with 3 shades of purple in it.  (No she is does not come with the scarf!!  That is one of the adorable sisters, Michelle!)


Sizes Available


This one is Ballet--Cranberry, Pink, and Grey

Sizes Available

 
This one is Hip Hop--Brown, Tan, and Cream

Sizes Available

 
This one is Faded Jeans--Blue, Light Blue, Tan, and Cream
 

Sizes Available


This one is Tango--Cranberry and Purple 
 

Sizes Available
We will add more colors as available.  If you have a request for a color, please send a request to moresisterstuff@gmail.com and we will be happy to do it if possible!

Thursday, February 14, 2013

Happy Valentine's Day!!


Happy Valentine's Day

from More Sister's Stuff!
We hope that you all have a wonderful day today with your loved ones!  

There is a new romantical movie coming out tomorrow.  Maybe you can convince your hubby to take you to the theater, if not, go with some girlfriends.  :)


love...
the girls

Wednesday, February 13, 2013

Valentine's Day Date Ideas

Here is what I am planning on doing this year for our Valentine's date. I love romantic date nights and am so excited it's my year to plan. I'm just going to cook a romantic, candle-lit dinner at home and then build a fort and cuddle and watch a good chick flick after dinner. I don't watch many chick flicks with the hubster, in fact I'd say I watch about 30 NBA games for every 1 chick flick we watch together, so I love to watch them every chance I get. So of course it's definitely gonna be all my choice, no matter how cheesy and romantic! :) I'm trying to decide which hunk I wanna see in my movie...


They are of course Cary Grant and Channing Tatum. Both great choices, but I have a feeling I'm gonna go with good ol' Channing in Dear John. Then we continue on to the next portion of our evening. I'm not gonna lie, I LOVE to kiss my husband. A lot. Who doesn't?! So I came across this book on Amazon and plan to try a couple of these new kisses out together that night. Why not?? :) It's probably too late to order for yourself, but you could always check your library or Barnes and Noble or something.


And finally, if I have time to find a couple of chinese lanterns, I would love to write love notes to each other and send them up into the sky. How romantic. I love it!


Well, these are just a couple ideas I have and I think it sounds like a splendid evening! I hope you all have a fantastic Valentine's Day whether you are celebrating it with a spouse, boyfriend, your kids, or your girlfriends, HAVE FUN!!! :)
 Mary

Tuesday, February 12, 2013

Kids Valentine Craft


Day 14:

I am always on the look out for crafts for those "I'm Bored" times.  My kids have actually stopped saying that because I threaten them with jobs, but there are those times when I know boredom is setting in because they start picking on each other.  Anyway, I came across this on Pinterest and knew the kiddos would love it, and they DID!!  Mine did not turn out as perfectly gorgeous as the Martha Stewart version, but you know what?  I don't care!  My kids love them.  My little guy wanted to make enough for every window in the house.  And the great thing is, you will probably have the supplies needed already on hand! 


Here is what you need:

Old crayons (or new Dollar Store ones) pink, red, purple and white are great Vday colors
Pencil sharpener
Wax paper
Towel
Iron

I cut 2 pieces of wax paper about 12"-18". (I got 8 hearts from 18").  Now take the crayons and start sharpening.  This was a fun job for the kids.  I had 4 little piles of crayon shavings when we were done.  Turn the iron on to a medium heat.  Lay your towel down nice and flat, place one sheet of wax paper on top.  Let the kids sprinkle the crayon shavings all around the paper.  We mixed ours up, but you could keep all of one color together if you wanted.  Next, place the 2nd sheet of paper on top of the other with the shavings in the middle.  Take the other half of your towel (or another towel) and place it over the wax paper making a little sandwich. Hold the iron on each spot for about 30 seconds.  ( I think this step is why ours did not look just like Martha's, some of us grew a little impatient.)
Now decorate your door or windows or what ever you choose.  You can use ribbons, a sewing machine, or tape.  Just be creative!  I hope your kids will enjoy!!

~Rachel~


PS... stay tuned, tomorrow we are going to give you a bonus Valentine's Day idea!  So check back tomorrow!

Monday, February 11, 2013

Scavenger Hunt Date


Day 13:

  A couple of years ago, I had this really fun idea to do for my husband.  I honestly can't remember if it was a Valentines Day surprise or just a fun date idea, but I figured it would be a great Valentines Day idea.  I basically sent him on a scavenger hunt doing nice things that eventually led him back to me where we had a nice, romantic dinner.  My mother-in-law was sweet enough to watch the kids for us so it could just be us in the end. 

  What I did was prearrange things in our area for him to go and do 2-3 hours before our official date started.  I started out with a note on the door in an envelope labeled, "Clue #1".  Inside it, I had just the address or street directions to the first place I arranged, a haircut.  I had already gone in and paid for his haircut and the tip.  I had arranged with the hairstylist to hand him the 2nd clue at the end of the haircut that again only gave him the directions to the next place.  This was a 30 minute massage.  We had Aveda schools in our area and the students had to get their practice massages in and it was very inexpensive.  They did a great job too!  Again, I had prepaid the massage and tip and had it arranged for the masseuse to give him the next clue.  I don't remember now what my 3rd clue was, sorry, but I believe I sent him to a favorite store where I had picked something out for him and had it wrapped up front.  The 4th and final clue was on the box of the gift.  That was leading him back to our house where I had a candlelight dinner and romantic night planned for us.  You can spend as much or as little as you want on this too.  If you have more money and it's not a problem, give him an hour long massage or add in a facial or pedicure/manicure, add a shave with the haircut.  Just be creative and you'll both have fun.


   I of course made sure I wasn't home when he got the first clue, but then made sure to be back pretty quickly so I could get dinner and the house ready for him to come home.  I would only have 3 hours, tops to get that part done.  If you do not want to supply the dinner part of it, for the last clue, you could put your favorite restaurant as the last clue and be there waiting at a table when he (she) arrives.  This one was really fun and my husband really liked it.  He had no idea what was going on but figured it out once he arrived at the first place and told the receptionist about the clue he had.  All of the places I arranged these at were very easy to work with and all thought it was a really neat idea.  They were all happy to help with it.

Friday, February 8, 2013

Strawberries..Strawberries..Strawberries


Day 12:
What kind of a Valentine's day can you have with out strawberries? Not much of one, just kidding they definitely can still be amazing; but to me, strawberries are the fruit of love. They are kind of shaped like a heart, not to mention their vibrant red color, and then last but very not least they are delicious!
Last year on Pinterest, I found some strawberries filled with a cream cheese filling, so I figured I would make them. They were sooo good, so good in fact that I made them for my wedding reception. I just made them again and would feel so selfish if I didn't share the recipe. So here it is..

1 carton of strawberries
8 oz cream cheese softened
1/4 cup sugar
1 tsp vanilla
8 oz heavy whipping cream

Mix the cream cheese, sugar and vanilla until it is all incorporated. In a separate bowl, whip whipping cream until hard peaks. Scoop 1/3 of the whipping cream and fold it into the cream cheese mixture. Add another 1/3 and fold it in. Add the last third, but don't fold it in as much, so it is really fluffy.
After it is made, scoop out the inside of te strawberry so you can pipe the filling in. Enjoy!! It's delicious!!
-Melanie-

Thursday, February 7, 2013

Valentine's Chex Mix


Day 11:
Okay, okay, I admit that I love Pinterest!  When I meal a meal idea I turn to Pinterest, when I need a project for the kids bordem (besides the offering of chores) I turn to Pinterest.  I seriously LOVE pinterest. And yes, my husband knows and approves.  So when I was looking for some ideas to make Valentine's Day a little more special for my kids I came across this Chex mix recipe.  I knew that it would be perfect for a little treat in their lunch.  I decided to try it out at the Super Bowl party we went to, and my daughters loved it so much they begged me to make it again, and soon!  Little do they know, they will be getting it again next week!


4 1/2 C. Rice Chex Mix cereal
1/2 C. white vanilla baking chips
1/4 C. peanut butter
2 Tbsp. butter
1/3 C. powdered sugar
1/4 C. white, pink, and red chocolate coated candies
2 Tbsp. sprinkles


Place cereal in a medium bowl.  In a small microwave safe bowl microwave baking chips, peanut butter and butter on high for 1 to 1 minute 30 seconds, stirring every 30 seconds, until melted and smooth.  Pour peanut butter mixture over cereal, stirring until evenly coated.
Place 1/2 of the cereal in a 1 gallon ziplock bag.  Add powdered sugar.  Seal bag and shake well.  Spread on waxed paper or foil and let cool for about 15 minutes.
Meanwhile, stir in sprinkles and candies in the remaining cereal.  Spread on waxed paper or foil and let cool for about 15 minutes.
In a serving bowl, combine both cereals.  Store in an airtight container (if you have any left).

Enjoy!

~Rachel~

Wednesday, February 6, 2013

Valentines According to Pinterest


Day: 10
There are so many great and fun ideas floating around Pinterest lately so I thought I would share some of my favorites that I have seen, here they are in no particular order...

1. These would be adorable..and pretty easy to make
glittered jars
You can find them here at Plum Adorable

2. I LOVE chocolate covered pretzels, you can do all sorts of decorations on them. So cute..and yummy!

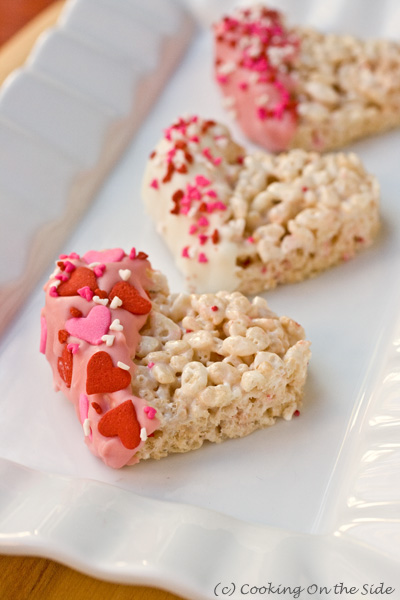
3.Another thing I love that is easy and endless decoration options, Rice Krispie Treats
Post image for Valentine’s Dipped Rice Krispies Treats
You can find them at Cooking on the Side

4. These delicious looking Red Velvet Cookie
Red Velvet Gooey Butter Cookies recipe
You can find them at Buns in my Oven

5. If your planning on cooking a home cooked soup for the big day, how cute is this?!
Heart Shaped Carrots | Recipe By Photo
You can find it at Recipe by Photo

Don't forget to follow us on Pinterest

--Michelle--


Tuesday, February 5, 2013

Doorway to the Heart...


Day 9:
I have thought and thought of a cute, cheap idea for my kiddos for Valentine's Day and I came across the idea of decorating their bedrooms doors.  For pre-school my son needs to work more on his cutting skills and so we went to work drawing and cutting out hearts.  After 20 minutes of work we had about 25 hearts ready for the 4 doorways.  We made them all sizes and different colors.  I then took some curling ribbon and cut it into different lengths, ranging from 12"-18".  (I started with 18"-24" but that was too long)
I am going to decorate each child's doorway on the night of the 13th so on Valentine's morning when they open their doors they will be surprised with hearts.  You may even want to add little love notes to each child on the hearts.  I am so excited to see my girls faces when they come upstairs that morning!  I know they are going to love it!  And my little guy will be surprised and happy to see his hearts he made hanging in his doorway.  

Fun and simple, that is the way we roll here!  


~Rachel~

Monday, February 4, 2013

Cookies&Cream Red Velvet Cupcakes


As you can probably tell by now, I am obsessed with Red Velvet.  There is no hiding it now, I love it.  So as you can see, when I have an excuse-like Valentine's Day-I will red velvet to the max!! This year I have, and I haven't stopped yet.  My newest creation is red velvet cupcakes with COOKIES & CREAM frosting!! Yum!! They are delicious, if I may say so myself.  And if it is not okay that I say it, my husband says it.  :) haha Seriously though, you have got to try these.  I know I may say this phrase all the time but I am saying it again, "they are sooo easy!!"

Want this easy but decadent recipe?? You got it! Follow these few quick steps and before you know it, you will be indulging in one of these beauties! So hurry and get started! Totally worth it.  And no need to wait until V-day, I didn't! Whip them out right now. :)

Cookies & Cream Red Velvet Cupcakes

Ingredients
-Red Velvet cake mix (with ingredients on box as well)
-8 oz cream cheese (room temperature)
-1/2 stick of butter (room temperature) 
-1 tsp vanilla
-2 Tbsp sugar
-1 Tbsp milk
-Powdered sugar until right constancy
-6 Oreo's (crushed)

Directions
Make and bake cake mix according to directions on the box.  While cupcakes are cooling, make the frosting.  Cream the cream cheese and butter until light and fluffy.  Add sugar, vanilla, and milk.  Mix until incorporated.  Add powdered milk.  Add some of the crushed Oreo's  leaving some to sprinkle on top when piped.  When I crushed my Oreo's, I used a blender, but I scraped off most of the filling because I didn't want it to be clumpy when I sprinkled it on top.  You can add the filling to the cream cheese mixture if you don't want to waste it, or you can just eat it like I did.  :) Once you have mixed everything in the cream cheese mixture, pipe it onto the cupcakes and sprinkle the rest of the crushed Oreo's on top.  I also think it would be cute if you broke Oreo's in half and then stuck a half piece on top of the frosting.  Just an idea.  Hope you love these as much as we did!! Enjoy!
-Melanie-


I almost forgot my favorite part about these!! 2 words 1. Mini. 2. Cupcakes.  Honestly, changed my life.  I know it wasn't me that came up with that idea because there is a minicupcake pan, but it is brilliant! I love cupcakes, but they are just hard for me to eat because they are kind of messy. 

Day 1, Day 2, Day 3, Day 4, Day 5, Day 6, Day 7, Day 9 

Friday, February 1, 2013

Letters of Love


Day 7:
Heather and I got together to makes these boxes for our Valentines a couple of years ago. I wrote a letter and put it in the box to my husband for a start for his "treasure" box, for his Valentines present. The point of it was for them to have a place for all of the love letters we give them over the years. The next year I filled the box with 100 strips of paper and on each one I put a reason why I love him. That's about as far as I've gotten with it. Truth be told, it has been filling up with letter and notes that he's written me. He's a lot better at that than I am I guess. I need to do better so that the box can be used what it was made for.

Things we Used:
a box (we got ours from Michaels)
scrapbook paper
ribbon
vinyl or stamps
any little scrapbook decorations you like that can spruce up the box, like frames or brads or anything else you can think of
Scrapbook ink to go around the edges


--Michelle--
Related Posts Plugin for WordPress, Blogger...