Monday, August 19, 2013

Chicken and Broccoli

It is getting to that busy time of the year again (oh wait!  Did it ever slow down?!? Not here I guess)
Anyway, it is just about time for school to start here, and that always means my life as a Mom becomes very hectic.  This year I think it is going to be even more so with the hubby opening his own practice (next week!!) and three kids in piano, homework, basketball, softball, one wishing for gymnastics, activity days, throw in a few nights of me giving massages and you have a very hectic schedule.  I usually set aside the busiest day of my week as "crock pot day."  It helps my life become a little easier, with one less thing to worry about.  Last school year it was Thursday.  I would get the kids on the bus and then as I was cleaning up breakfast I would also start dinner.  I just found it easier to only have only clean up time.  Some recipes like this one only require a few hours and I would start them as I cleaned up lunch.
I love the easiness of crock pot meals.  They are for the most part, quick and easy, and then you get to smell them cooking all day long!  YUM!


I call this one Sunday Chicken and Broccoli because it only needs to be in the crockpot for 3 hours, and since church for me is 3 hours, it is perfect!  But we have it on all different days and it still tastes just as wonderful!  In fact, I made it last week and my little family of 5 1/2 (Oakli doesn't eat much) ate the entire crock pot full in one sitting!!


Sunday Chicken and Broccoli

2 to 3 C. cooked rice
3-4 cooked chicken breasts, diced
1 bunch of broccoli, steamed and chopped
2 can of cream of mushroom soup
1 C. Mayonnaise (we like Miracle Whip)
1 T. lemon jiuce
1 1/2 shredded cheddar cheese

Pour rice in bottom of crockpot.  Layer the chicken and broccoli on top of rice.  Make a sauce with the remaining ingredients and pour over the top of everything.  Set crock pot to low for 3 hours (or while at church).  

~Rachel~


Thursday, August 15, 2013

Camo Cupcakes

My son just celebrated his 5th birthday.  He is my only summer b-day in the family and I was so excited to make him an ice cream cake, but he didn't want one.  He wanted cupcakes!  Cupcakes? Really?  And then I remembered that my friend had made some darling camouflage cupcakes for her oldest sons birthday this year.  Well, my little guy loves camo everything, so I knew they would be a hit!


My girls were very excited to help me with this adventure, and we ALL love how they turned out.


Here is what you will need...

Chocolate cake mix
White cake mix
All the ingredients that go with the two cake mixes (eggs, oil, water, ect...)
Green food coloring
four mixing bowls (can be small)

Make your cake mixes according to directions, DO NOT BAKE.  :)
In the four bowls you will need 1. just white, 2. just brown, 3. will have white with a dash of brown and green food coloring to your liking, and 4. will have equal parts of both chocolate and white.
so again...
1. white
2. brown
3. green
4. tan
I hope this is not confusing.  :/

Line your cupcake pan.  Preheat the oven according to the directions on your cake mix boxes.
Now for the fun part!! Have one teaspoon for each bowl.  I used our cereal eating spoons.  My girls were each in charge of one bowl and I had two.  Then we just started putting a spoonful of our color into each cupcake liner.  Fill them until they are about 2/3 full.  Bake.
I made my basic Cream Cheese frosting and just added a little cocoa to make it tan.  My son LOVED them!

4 oz cream cheese
1 cube butter
1/2 tsp vanilla
4 C. powdered sugar
Mix ingredients.  You can add a little milk if it is too thick, but you probably want it a little on the thick side for cupcakes.

Enjoy!
~Rachel~

Tuesday, August 13, 2013

Nicholas Sparks, The Choice

Another great Nicholas Sparks book is "The Choice".  


Travis Parker strikes up a friendship with his new neighbor, Gabby Holland.  All of his friends are happily married with great kids too.  This is what he has wanted too but just hasn't found "The One" yet.  He is hoping the friendship will blossom to something more, but their is one problem, she already has a serious boyfriend of several years.
This is also a very touching book with fun and witty times, a great love story with another heart wrenching moment too.  Be ready for more tears!!  I highly recommend "The Choice" as another good book to read!
~Stacy~

Monday, August 12, 2013

French Dip Sandwiches

   I have always loved French Dipped Sandwiches and have tried to make them a couple of times, but they never turn out like a restaurants...until now!!!  My family recently visited my sister-in-law and she made these for us.  They were absolutely delicious.  I had to make them the very next week at home because I liked them so much.  Just the aroma in the house while it is cooking is enough to set you over the top!!!  My sister-in-law and her sisters also share MANY recipes on their blog Stir Occasionally.  I can't wait to check out more from there!

For the French Dip Sandwiches, you will need:

Ingredients:
4 pounds beef chuck roast
1 tablespoon minced garlic
1 tablespoon dried rosemary
3 bay leaves
1 cup soy sauce
6 cups water
Directions:
Place roast in slow cooker. Season with garlic, rosemary, and bay leaves. Pour in soy sauce and water. Cook on low setting for 6 to 10 hours. Unlike most roasts, the longer the better.
To serve, place in hamburger buns or split french bread and top with your preferred cheese if desired. Feel free to dip your sandwich in the au jus left in the slow cooker too!
~Stacy~

Friday, August 9, 2013

Nicholas Sparks, The Last Song

   I have recently finished another series of books and was in search of something else good to read.  I had read a couple of Nicholas Sparks books quite a few years ago and really enjoyed them, so I thought, "What the heck, I'll try another one".  The (ebook) waiting lists for most of his books were REALLY long, so I started with the shortest one on the list, "The Last Song".  
   

Ronnie and her brother, Jonah, have to go to North Carolina at spend the summer with their father who she hasn't spoken to in three years.  She learns who she is and really, what is important in life.  She finds love and forgiveness too.  
   I LOVED this book, but be ready for a HUGE tear jerker.  I was really sobbing at one point, but it was worth it!  Such a good book!  Hope you'll enjoy it too!
~Stacy~

Thursday, August 8, 2013

Yummy Bars


This was one of my favorite treats growing up, and we were not even the ones who made them!  Heather's friend would always bring them over for us and they were usually gone in +2 days!  Finally, just before going off to college, we got the recipe from her so Heather and I could make them there, to impress boys there, and it did!  I have made them for friends and my kids now and they love them too.  I made them again today and my kids asked if they were really called "Yummy Bars" or if I just called them that because they are "Yummy".  The answer is, it fits for both questions.

The recipe is as follows:

6 Cups of Rice Crispies
1 Cup Sugar
1 Cup Caro Syrup
1 Cup Peanut Butter
1 Cup Chocolate Chips
1 Cup Butterscotch Chips

(This will fill a 9X13" pan.  If you want a full cookie sheet of them, do 9 cups of Rice Cripsies and 1 1/2 cup of everything else).

1.  Put rice crispies in large bowl for mixing.
2.  In a medium sauce pan, combine sugar and caro syrup on medium heat until sugar is dissolved and the mixture is boiling.
3.  Either turn the burner to low, or take pan off the burner and add the peanut butter.  Once the peanut butter is melted, add to the rice crispies until evenly mixed.
4.  Pour rice crispy mixture onto the pan and pat until flat.  (I recommend you spray your hands with cooking spray to pat flat.
5.  In another sauce pan, melt the chocolate and butterscotch chips then spread over the rice crispies.
6.  We have always cut them into 1 to 1 1/2 inch squares to serve.

Monday, August 5, 2013

Chocolate Zucchini Bread

A couple of years ago, when visiting my Mom around this time of year, she had made batch after batch of this wonderful zucchini bread.  I could not get enough.  Sadly, she already had homes for most of the loaves.  I could not wait to get home and have a reason for making some of my own, but really, lets be honest, do you need a reason other than wanting a little chocolate?!? And it must be healthy right?  It has zucchini in it!  Anyway, back to this healthy bread...

Chocolate Zucchini Bread
2 (1 oz) squares unsweetened chocolate
3 eggs
2 C. white sugar
1 C. oil
2 C. grated zucchini
1 tsp. vanilla
2 C. all-purpose flour
1 tsp. baking soda
1 tsp. salt
1 tsp ground cinnamon
3/4 C. semisweet chocolate chips

Preheat oven to 350.  Grease (2) 9 x 5 loaf pans.  In a microwave safe bowl, microwave chocolate until melted, stir occasionally until smooth.
In a large bowl combine sugar, eggs, oil, zucchini, vanilla and chocolate.  Mix well.  Stir in the flour, soda, salt and cinnamon.  Fold in the chocolate chips.  Pour batter into prepared loaf pans.
Bake in preheated oven for 60-70 minutes, or until a toothpick inserted in the center comes out clean. 

I have to admit, every time I have made this, mine stick to the bottom, not all of it, just a few chocolate chips here and there.  I called to complain to my mom and she said she has had the same problem in the past and she recommended that I use a little parchment paper lining the bottom.  I am trying this trick tomorrow, hopefully I get to it, and I will let you know how it goes!  :)


Happy Baking!
~Rachel~

Wednesday, July 31, 2013

Raspberry Preserves

A couple of years ago I wanted to try something new.  I didn't know what the difference between jam and preserves was, so I decided to test it out.  I made one batch of raspberry jam and one batch of raspberry preserves.  The jam needs pectin, which sets the jam and makes it thicker, the preserves are more liquidy (I know that is not a word, but that is how I roll).  With preserves you don't smash your berries like you do with jam, It does'nt really look like it in the picture, but there are quite a few whole berries in each pint, unlike jam.  I don't mind the seeds, if you do you have have to get rid of half the seed like you do with jam.
At first I was not sure what exactly we would use the preserves for.  Me being one who does not like things to get soggy, definetly did not want them on toast.  What to do??  The first test was vanilla ice cream... umm, YES!!  Delish!  Our next test was pancakes/waffles... WOW!  My hubby and I never, and I pretty much mean never, put maple syrup on them anymore.  Seriously, so good!  When we were down to 2 pints left, my hubby started to get worried!  But don't worry, this year I made two batches, there will be plenty this year.


Easy Raspberry Preserves

8 C. whole raspberries
7 C. Sugar
1/3-1/2 C. lemon juice, depending on the tartness of the berries

PLace berries in a heavy bottomed pan and pour sugar and lemon juice on top.  Set the pot over low heat, stir everything together.  Continue to cook, stirring occasionally.  As soon as you notice the first signs of boil, set timer for 5 minutes.  Remove from heat when the timer goes off.  Cool to room temperature in the pan, then transfer to jars.  The preserves will keep in the freezer for up to 3 years, or a few months in the fridge.  
I actually process the preserves in a hot bath so that I can store them in my storage room.  Process them in the hot bath for 10 minutes (after the water comes to a full a boil).

Enjoy!
Rachel

Monday, July 15, 2013

Handmade Satin Flower Hairclips

  The Newest arrivals to our collection of Accessories are these adorable Handmade Satin Flowers!  The look great on ANY age!  They come either Plain or Accessorized with Feathers.  Right now our collection is with Pink, Pink with Pink Polka Dots, Purple, White, Black, Yellow, and Teal.  We will continue to add colors as we find them and hope you like them too!

*Buy 1 for $5.00 and get the 2nd one of the same color FREE!  Just change the cart number to 2 and it will take off the $5.00!!


Plain Satin Flowers- 

Colors Available
Select Middle Accessory


Satin Flowers Accessorized with Feathers-

Colors Available
Select Middle Accessory

Saturday, July 13, 2013

Colorful Magic Cookie Bars

Colorful Magic Cookie Bars


Can you say YUM?  Don't these look delicious?  I was on the Kellogg's site looking for coupons and just browsed their desserts.  This is one that caught my eye!  What could be wrong with anything that has chocolate chips, sweetened condensed milk, and crunchy corn flakes?  If you want to give it a try, here is the recipe!


Description

It's good that these bars are easy to make--just layer, bake and cut into squares--because they're so delicious that they'll disappear in no time.
Prep Time: 15 minutes
Total Time: 1 hours 10 minutes
Servings: 48 

    Ingredients


  • 1 1/2 cups Kellogg's® Corn Flake Crumbs
  • -- or --
  • 6 cups Kellogg's Corn Flakes® cereal
  • 3 tablespoons sugar
  • 1/2 cup margarine or butter, softened
  • 1 cup coarsely chopped walnuts
  • 1 package (6 oz,. 1 cup) semi-sweet chocolate morsels
  • 1 1/3 cups (3 1/2 oz.) flaked coconut
  • 1 can (15 oz.) sweetened condensed milk

Directions

1. Measure KELLOGG'S Corn Flake Crumbs, sugar and margarine into
13 x 9 x 2-inch baking pan. Mix thoroughly. With back of spoon, press mixture evenly and firmly in bottom of pan to form crust.

2. Sprinkle walnuts, chocolate morsels and coconut evenly over crust. Pour sweetened condensed milk evenly over top.

3. Bake at 350° F about 25 minutes or until lightly browned around edges. Cool completely before cutting into bars. Store in airtight container in refrigerator.


MICROWAVE DIRECTIONS:

1. Microwave margarine in 12 x 7 1/2 x 2-inch glass baking dish on HIGH until melted. Add KELLOGG'S CORN FLAKES Crumbs and sugar. Mix thoroughly. Press lightly in bottom of dish to form crust.

2. Sprinkle walnuts, chocolate chips, and coconut evenly over KELLOGG'S CORN FLAKE Crumbs crust. Pour sweetened condensed milk evenly over top.

3. Microwave on HIGH about 7 minutes or until lightly browned around edges. Cool completely before cutting into bars.

Hope you'll enjoy them too!
~Stacy~

Thursday, July 4, 2013

Happy 4th of July!!

    Happy Birthday America!!! 237 Years Old today! What an awesome thing. We hope everyone can have a FANTASTIC Independence day with lots of things to celebrate. This is one of the Sista's favorite holidays, especially remembering our younger years!
    It was tradition in our small town to start out with a pancake breakfast at the church put on by the Scouts. We would venture on "The Square" for the city Parade that would start at 10:00 am, sharp. It was always started with 4 or 5 Air Force Jet planes flying overhead in formation. All of the schools, clubs, and even many stores participated and displayed their floats. The 4-H club always had kids on horses, as well as Cowboys and Cowgirls from the rodeo and different groups. All of the little league and All-Star baseball teams had their groups riding in pick-up trucks borrowed from the local car dealerships! It was so much fun. We were always sad when it was over.
    Next was barbecue or picnic time with our families. We would either go to the Dam our Grandpa worked at or to our cousins home with a pool and just spend the rest of the day playing with our family...LOTS of cousins. It was AWESOME! We would then make our way over to the fireworks and all cram into the back of the car/van/ or truck to watch the fireworks and hear the great 4th of July music that would help us remember all of the people who had made our freedom possible. What a great thing to celebrate! It has been a fun challenge to incorporate old and create new traditions with our growing families, especially with so many of us living in different states throughout the country, but we all do our best to make sure our kids remember what to be grateful for and have great memories in doing this. When I (Stacy) first moved away from little town, Idaho, I was honestly shocked that EVERYONE didn't have parades and things of this nature, but we have tried to make sure to spend the day with family and friends and of course find fireworks somewhere to watch. Whether it is at the end of a baseball game, somewhere in the city, or just doing them on our own, we will be there!!! Here are a couple of ideas to help the celebrations along...
Fruit Flag.  My friend also made a Fruit Flag Pizza last year.  It was delicious!  
Here is a recipe for Fruit Pizza.

Oreo Cookies!  Otherwise known as Decadent Chocolate Truffels.
Here is the Recipe!
Substitute the chocolate chips for almond bark or white chocolate chips so you can color them.  Sprinkle them with blue and white sprinkles as another option!

4th of July Popcicles!  (official recipe at link)
You can also just be creative with juices to make the colors.  One note, make sure they are SET hard, frozen solid, before moving to the next color or you will end up with pink and purple, as we found out this with with our first attempt!  

With all of the fun and family fun, don't forget what it is all about...


Thank you, to all of you.  We will always be grateful!

Happy Birthday, America and Happy 4th of July!
Love , the Sissies!


Saturday, June 22, 2013

Spring Cleaning- Outside Edition

   We just posted the "Inside Edition" on things we were going to Spring Clean inside our homes, this one will be strictly on our to do lists for the outsides of our home to get ready.  Here are some ideas for your own yards!

*  Trim shrubs, trees, bushes.  If you are not familiar with the area, plant, or just gardening in general one safe thing to do is watch for the people around you to start trimming the same kinds of plants.  Watch especially for professional landscapers to be doing it since they will be most likely to know when it is appropriate.  For example, when Stacy moved to Texas, she had never been around Crepe Myrtle trees and had never done anything with them.  She just waited until she saw people trimming them along the sides of the roads (all professionally landscaped) and then did the same at home-all was well, everything came up full bloom that year!

*  Aerate your lawn.  If you live in an area with clay dirt or your lawn has heavy traffic on it, this is a great thing to consider.  Heather does this to her lawn every year and her lawn looks AMAZING every year too!    If you have Bermuda, Zoysia, or St. Augustine grass, it is best to do this from April to June.  Fescue, Bluegrass, and Rye are best to be done August through October.

*Fertilize!  The local stores in your area will have the fertilizer grasses common for your area needs and most will have an expert if you have questions on how and when to apply.

*Insect and Bug sprays, pellets, repellents   These also can be found at local stores and you can ask what the best products are for the particular pests in that area.  Ex:  Fire ants in Alabama- there were a lot of products out there but there were some that were far better than others.  We would also find out when our neighbors were going to spray because it really did no good if we sprayed and then 2 weeks later they did, it would just cause the left over bugs to come right back to our lawn, so try to coordinate with them!

* Mulch flower beds!  Clean out old or dead plants, plant your new ones and then mulch around everything! It not only looks amazing, but it helps keep the weeds out and helps keep the moisture in better for the plants you do want there!

There are probably things we have forgotten and definitely things are different throughout the country so one more suggestion would be to check with your local nursery and see if they have a nice "Honey-Do" list specific to your area.

~The Sissies~


Friday, June 21, 2013

Summer Fun Ideas


  I have been looking for some fun things to do for me and my boys this summer.  Since we just moved to Arizona, I thought finding creative ways to stay cool and have fun was a must!  We do have a pool and everyone has told me we will spend all of our time in it this summer, however, I do not WANT to be in a pool everyday!  I don't know about you, but I don't like pool hair, or having to shower and get ready after being in the pool (which I am one who has too), especially if you have already showered and gotten ready once that day!  My kids also can't understand the concept that Mom doesn't want to get her hair wet and constantly try to splash and dunk me.  So, here are some alternatives I have found, mostly thanks to Pintrest!

1.  Homemade Sprinkler 


This one first caught my eye!  What a fun way to have a sprinkler for them to run in.  It only costs for the male, female adapter, which can be purchased at any hardware store, including Walmart and Target, for about $5.00.  Then it is just using an empty 2L bottle, which most people drink in the summer at any party, right?  You just poke holes in the bottom and hang it from a tree.  So much fun!


2.  Make Superheroes
a.

b. 

c.   

a.  Make superhero outfits, for boys or girls!  The first image is just made out of 2 empty pop bottles, spray painted in whatever color you want.  Glue them to a piece of cardboard the same width at the bottles side by side.  For the straps, attach ribbon with glue, staples, really whatever you think will hold it.  Finally, use crepe paper, or left over fabric to create flames.  Glue to the inside of the bottles and you are set!
b.  The second one is simply making superhero logos the kids can attach to their shirts, cape, or as shown above, on toy buckets to make cleaning their rooms easier.  These are just made out of felt, which is usually around $0.29 a piece or less.  (Michael's, Hobby Lobby, Walmart, Target)  You will also need to print out the superhero logo (click here for the printables).  After you have cut out the shapes from paper, pin it to the color of felt you want, cut the felt out, and then simply hot glue them together!  So easy and cute.  You can use safety pins to attach them to shirts.
c.  My friend just made these adorable masks for my boys and her girls and they wore them everyday for the entire week we were visiting.  They are AWESOME, and so easy.  The image originally came from a cereal box, but can be found here.  Again, all you will need is felt and small elastic ribbon.  She made 2 per child and sewed them together around the eye holes and the shape itself, 2 colors of their choice so it can be reversible.  Attach the elastic in between the 2 colors before you sew so it doesn't show.  The kids literally wore them all of the time, including to bed!  They would reverse the color for different roles and powers.  It was so fun!


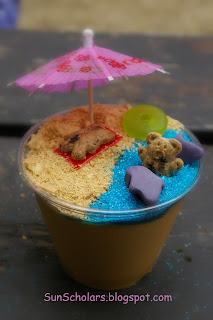
3.  Dirt and Beach Cups


Dirt cups!  I loved these as a kid, and they are still good as an adult!
a.  Dirt cups require chocolate pudding, smashed Oreo's, and bugs like the gummy worms.  You can be creative though if you can find other kinds of gummy bugs!  Just make you pudding, set aside.  Crush the Oreo's (great job for the kiddos to help with!).  Layer starting with the Oreo's, then pudding, and finish off with the Oreo's.  Then let them put their worms in or on the dirt.  Serve them chilled.
  This can also make a fun friends or family over dessert.  My aunt displayed in once in a big Terra Cotta pot.  She had the bowl with the pudding sitting inside of it.  She had fake plants coming out of the top so it looked like a potted plant with dirt.  It was really neat.  (just a side note!)
b.  Beach cups.  Here are two versions of them.  The first one is made with Vanilla pudding and blue food coloring, whipped cream with Oreo's in them and then sweetish fish on the top.  Layer pudding, whipped cream, etc until pudding is on top and then put your fish in.
  b2.  The second version is made with butterscotch pudding, blue colored sugar, crushed up graham crackers, part of a fruit roll up (the towel under the teddy graham), a life saver, teddy grahams and fruity gummies.  Top it with the little umbrella.  You should either be able to make a bunch of them at once or have plenty of left overs for another time!

4.  Go on a Scavenger Hunt

  Everyone can get empty toilet paper rolls pretty quickly.  Just make sure everyone in your family knows to set them aside until you have the amount you need for your binoculars, 2 per child.  These are so easy to make, just glue the 2 rolls together along down the middle, long ways. Use a hole puncher (or pair of scissors) to poke a hole on either side of the rolls.  Finally attach yarn, or string, or ribbon through the holes punched so they can hang on the child like a necklace.
  Have the kids write down what they think they will see on their adventure, or maybe pick out 10 things you think they should find.  Give them the paper and a pencil and go exploring.  You could take these to a zoo or botanical garden to the kids can "see better" or find more things through them.  They will have a blast.


5.  Make Healthy Treats
a.     b.   
   a.  Apple Cars- These are incredibly easy to make.  Just slice an apple into medium sized slices.  Cut grapes in half and attach one on either side of the front and back of the apple, attaching with a toothpick.
  b.  Apple Mouths-  Again, slice your apple into thin slices.  Spread peanut butter on the insides of 2 slices.  Attach marshmallows to one apple slice and then top with the other peanut buttered slice.

6.  Make some 4th of July treats
a.
b.

a. 4th of July Popsicles
These take:
1 Cup Cranberry Juice
1 Cup Lemonade
1 Cup blue Sports Drink (Gatorade, Powerade)

1.  First put Cranberry juice at the bottom of a small cup and freeze until almost firm (about 1 hour).  Place popsicle stick in .
2.  Next, fill about 2/3rds of the way up with Lemonade and let freeze.
3.  Finally, fill the remainder with the Blue Sports Drink and let freeze.
4.  Pull out of the cups and enjoy!

b.  4th of July Pretzel Rods
  With these, simply dip the ends of the pretzels (I like half way), with melted white chocolate, white almond bark, or dipping chocolate.  Immediately cover with your Red, White, and Blue sprinkles or colored sugar.  Let harden and then eat.
**One trick with dipping things like pretzels or strawberries, put a small amount of vegetable or olive oil in the chocolate until it runs off your spoon smoothly.  It should be about a tsp or less, but it just helps cover things easier and with no clumps.


7.  Movie Mania
File:Madagascar3-Poster.jpg

  Of the 3 areas I have lived in since I had children, each have had a Summer Movie Program.  Basically, they will have a movie each week that is an older movie, but it will only cost between FREE and $1.00 per person.  Some areas, like Birmingham, have more than one movie option, maybe something rated G for the youngest kids like Hotel Transylvania, and something PG for older kids like Alvin and the Chipmunks- Chipwrecked.  Some of the different theaters would even be playing a different movie in different locations, so see what you would like to watch the most.
  This last week, we got to watch Madagascar 3- Europe's Most Wanted.  This week it will be The Lorax.  This keeps you busy at least one day a week.  If your area has more than one movie, you could go multiple times that week.  If you don't know if your theater does this program, google your area or ask friends!

8.  Balloon Games
a.   b.  c.  

  a.  Water Piñatas.  Just find some waterproof toys to put inside the balloons for prizes and hang the balloons up throughout your yard.
  b.  Balloon Race.  The object is to see who can get the most balloons into their basket only using pool noodles.  You can have a time limit if you want, but do not have to.
  c.  Balloon Horseshoe.  The picture shows where they have put a point value on each balloon.  You can either do that or maybe a set amount for each balloon.  Using helium in the balloons, tied them around in various parts of your yard.  Use a hula hoop to toss over the balloons to collect your points.

9.  Ball Games


  a.  Kid Croquet.  For this one, cut hula hoops in half and spread them throughout the yard for the "wickets" or hoops.  Use medium to large bouncy balls or kickballs.  If you do not have flags already to use, you can make some very easily with a dowel and felt or left over pieces of material.
  b.  Good old fashion KICKBALL!!  Get a group of friends together and get a small bouncy ball or kickball.  We just did this with some friends last week and had so much fun!  We even had two 3 years olds and it worked perfect for them too.

10.  Playgroup

  Depending on your area, you will need to figure out what will really work for you all.  For instance, right now here in Phoenix, it has been 112-114° for the past several weeks, so a playground Playgroup would be pretty much out of the question, even early in the morning.  We do have some covered playgrounds, so those ones might work.
  Another possibility is to go to a splash pad.  Of the 3 areas I have lived in, there have been several FREE options to choose from.  There are also paid ones, but why pay when you can go to a free one?  If you don't already know of one in your area, google it or ask around to people who have lived in the area longer than you.  You should be able to find some good options that will work for you and your friends.

Hopefully this has given you some fun options to keep you busy with your kids this summer!  
Hope you enjoy!
~The Sissies~

Monday, June 17, 2013

Father's Day Dinner


I wanted to make a great dinner for my husband yesterday for Father's Day.  I know I have already posted the "Star Jones Lobster and Steak dinner," but I wanted to make it again for him and it turned out great.  My 6 year old loved the lobster so much, he ate 2 whole tails!  He kept saying over and over how good the lobster was too.  It kind of made my day!

The rolls are the recipe Michelle posted a while ago that I finally tried.  Click here for the link.

Grilled Green Beans
As for the green beans, this was the first time I tried them on the grill this way and they were AMAZING!!  I wish I had made more.  
1.  All I did for those was pull out about 2-3 cups of frozen green beans and put them in an 8X8" glass dish.  
2.  I put 1 tbsp of olive oil over the top of them and made sure they were all covered with it.  
3.  Then I salt and peppered them.  
4.  Finally, I just put them on the grill when I put the steak out there.  I left one of the burners off and just placed the pan over that burner so they weren't getting direct heat.  I stirred it when I turned the steak over and took them off just prior to taking the steak off the grill.  DELICIOUS!


Strawberry Cheesecake with Sour Cream Topping

My husband loves cheesecake and I have tried a homemade recipe before and quite frankly, it was gross.  That is the reason I have always just done them from a box--they turn out everytime and they are good.  Well, I found this recipe in the July 2013 Issue of "All You".  I just had to try to make another homemade cheesecake again.  Turns out, it was Delicious too!  We all liked it.  So here is the recipe.

16 oz. Cream Cheese at room temperature
1 Cup Sugar
3 Large, lightly beaten eggs, at room temperature
2 tsp. Lemon Juice
2 tsp. Vanilla Extract
1 9-inch prebaked Graham Cracker crust
1 1/2 Cups Sour Cream
1 pint of fruit of choice

   1.  Preheat oven to 350°.  In a large bowl, beat cream cheese and 3/4 C Sugar with an electric mixer on medium until smooth.  Add Eggs, Lemon Juice, and 1 tsp Vanilla; beat until blended.  Pour into crust.  Bake until edges are set and center jiggles a bit, about 30 minutes.

   2.  In a medium bowl, stir Sour Cream, 3/4 C Sugar, and 1 tsp Vanilla.  Remove cheesecake from oven; let cool 5 minutes.  Spread Sour Cream mixture on top and return to oven.  Bake until topping is firm, about 15 minutes.  Let cool 20 minutes on a wire rack, then cover and chill 4 hours or overnight.

   3.  If desired, place half of the berries of choice in a medium bowl, sprinkle with 1 tsp Sugar and lightly mash.  Let stand 10 minutes.  Serve over cheesecake.

More recipes like this can be found at All You.

Graham Cracker Crust
If you don't have a Graham Cracker crust on hand, you can easily make one by combining a package of Graham Crackers- crushed, 4 Tbsp of Sugar, and 4 Tbsp butter, melted.  It should be soft and kind of clumpy.  Mash it around the sides first and make sure they are covered, then mash the rest down on the bottom.

Wednesday, June 5, 2013

Rhubarb Dump Cake


When we were growing up I remember every year for Father's Day my Mom would bake my Dad a Rhubarb pie. He LOVED rhubarb pie!! Now that I am all growed up, I love  rhubarb too! I love to make rhubarb crisp, rhubarb/strawberry pie or crisp and this delicious rhubarb dump cake.  This is my children's favorite rhubarb recipe, so I thought I would share.

Rhubarb Dump Cake

1 lb rhubarb, cut into 1/4" pieces (between 4-5 C.)
1 C. white sugar
1 (3 oz) strawberry jell-o
1 package yellow cake mix
1 C. water
1/4 C. butter, melted

Preheat oven to 350*.  Grease a 9x13 baking dish. Spread rhubarb on the bottom of the baking dish. Sprinkle sugar over the rhubarb, followed by the jell-o, and finally the cake mix. Pour the water and melted butter over the top.  Do not stir.  Bake 45 minutes or until rhubarb is tender.


Hope you enjoy!!
~Rachel~

Related Posts Plugin for WordPress, Blogger...